Pages

Sunday 22 December 2013

Seasons greetings


Here's wishing you a very happy Christmas and a wonderful new year.

Gertie xx

Saturday 21 December 2013

December's bake of the month

OK, this technically isn't a bake but it does contain something that has been baked.

This recipe requires no cooking, only two ingredient and just 10 minutes preparation - how easy is that !!!!!!

It's Christmas pudding ice cream. Trust me, you have got to try it, it's fabulous.

I don't have any photos to show you at the moment (because I haven't made this years yet) but come Boxing Day I'll try and put some up.

Christmas pudding ice cream

Ingredients:
  • 1 litre tub of vanilla ice cream
  • 7oz/200g left over Christmas pudding, crumbled

Method:
  • Put the tub of ice cream into a microwave (or leave it out of the freezer for half an hour) to soften slightly so you can get it out of the tub.
  • Transfer the ice cream to a food processor and whiz until smooth. 
  • Gently fold the crumbled Christmas pudding into the melted ice cream then pour into a freezer-proof container. Freeze for several hours (or it you can't wait, at least two.....).
  • Bring the ice cream out of the freezer about twenty minutes before serving to allow it to soften slightly, otherwise you'll never get it out of the container!!!  If your container is microwaveable you can always pop it into the microwave for a few seconds to soften. 

Gertie xx

Sunday 15 December 2013

Deck the halls

Last week I showed you 'Rudolph'. This week I thought I'd show you a couple of other Christmas decorations in the Gertie household.


This is the fireplace in the living room. There used to be a gas fire in the centre. We inherited it when we bought the house but it got condemned several years ago !!!! Normally the large vase, which you can just make out on the right of the picture, sits in the centre, but during the festive season it gets replaces with a cross stitch wall hanger.


I bought the kit from a sewing shop in a beautiful place called Solvang in California. At the time (1991) it was the largest cross stitch project I'd ever done.


We go from the largest to the smallest project I've ever made. These are 'the 12 days of Christmas' cross stitched on 27 count fabric - that's 27 holes to the inch. Ouch !!!! I seem to remember setting myself a challenge to make one 'day' per month. I think I did it with one month to spare.

These cute little fella's are Waverly the snowman and Iggy and Mo the snowballs. They're all hand knitted and Waverly's sack contains twelve little knitted bags, each with a knitted present inside.... 

On either side of the mantelpiece are two cross stitch Christmas cards and above that is the 'jingle bells' bunting I made a couple of weeks ago. We had some baubles spare from the Christmas tree so I just put them in a glass vase, which is at the bottom of the main picture.


I decorated the dresser in the kitchen with paper snowflakes (so easy to make and surprisingly very therapeutic too). The 'falling' snowflakes are simply made by attaching them to a length of white sewing cotton.

Have a great week.

Love

Gertie xx

PS why not pop over to Handmade Monday to see what other fellow craft bloggers have been up to.

Sunday 8 December 2013

How to make a Rudolph

Take one newel post (otherwise known as a handrail post).


Attach to the post the following.


You now have your very own Rudolph.....


Have a great week.

Love

Gertie xx

PS why not pop over to Handmade Monday to see what other fellow craft bloggers have been up to.

Sunday 1 December 2013

Christmas buntings

Here at last are my Christmas buntings. Last weekend was one of those where time just disappeared so we weren’t able to take some photos.  I was determined to get them done this weekend so there would be no lunch on Saturday until they were photographed....


I wanted to put a Christmas motif on the flags but not something that wasn’t too intricate, given that the maximum width of the flag is six inches, and it had to be instantly recognisable. I never make things easy for myself !!!

Having looked at all things Christmassy I decided on a snowman.  Why, I have no idea, but I somehow convinced myself that drawing the snowman using ‘Word’ would be better than using ‘Corel Draw’. The result was Mr Snowman ended up being a little misshapen....


There were lots of beautiful Christmas fabrics to choose from, however I wanted something that was festive, but not too shouty so the applique images would be drowned out. I eventually went for red and green fabric which had tiny stars printed on it.


I knew what kind of lettering I wanted for the flags - sort of rounded, bubble, kind of thing - so thought 'Word' or 'Open Office' would have a font suitable. Sadly they didn't so I did a search on the internet and found just what I was looking for.


As each letter was A4 size (they were meant for children's school posters) I printed the letters I needed, scanned each one, then using Coral Draw, I re-sized them to make the templates.


Both the letters and snowmen were cut from felt and attached using a machine blanket stitch. Normally I would have just stitched them by hand but as there were so many to do I thought it would be quicker to do it by machine.

For the top ribbon I simply used some red spotty dressmaking fabric.
 

Have a great week.

Love

Gertie xx

PS why not pop over to Handmade Monday to see what other fellow craft bloggers have been up to.

Monday 25 November 2013

November's bake of the month

No Christmas bunting to show you this week. They're finished but we didn't have time over the weekend to take any photos. They're be up next week - promise !!!!

So rather than not put a blog up I thought I'd share with you my recipe for Christmas cake. I know there are thousands of fruit cake recipes but trust me, you won't be disappointed when you try it.

This cake is perfect for making now or several months in advance. Simply 'feed' it with alcohol every three/four weeks until the end of November, then every week until you're ready to decorate it.

As this is an ancient family recipe all the weights and sizes are in 'old' money. If you want them in metric there'll be lots of sites on-line that will be able to convert it for you.

There's no photo this time. Lets be honest, one fruit cake looks very much like another.. 

Boozy Christmas cake

Ingredients of 7 inch round tin/ 6 inch square tin:
  • 7oz currants
  • 4oz sultanas
  • 2oz raisins
  • 2oz glace Cherries – chopped 
  • 2oz mixed peel
  • 2oz mixed chopped nuts
  • 2 tablespoon brandy/rum or any spirit
  • 5oz plain flour – sieved 
  • 1 teaspoon mixed spice
  • 1oz ground almonds
  • 4oz soft brown sugar
  • 4oz butter (softened)
  • 1 tablespoon black treacle
  • 3 eggs 

Ingredients for a 9 inch round tin/ 8 inch square tin:
  • 13oz currants
  • 7oz sultanas
  • 3 ½oz raisins
  • 3 ½oz glace Cherries – chopped
  • 3 ½oz mixed peel
  • 3 ½oz mixed chopped nuts
  • 3 tablespoon brandy/rum or any spirit
  • 9oz plain flour – sieved
  • 1 ¾ teaspoon mixed spice
  • 2oz ground almonds
  • 8oz soft brown sugar
  • 8oz butter (softened)
  • 1 ½ tablespoon black treacle
  • 5 eggs

Method:
  • Put all fruit in a bowl then add the alcohol. Give the fruit a good stir then leave overnight.
  • The following day preheat oven to 140º c/Gas Mk 1. Fan oven 130ºc.Line the cake tin with two sheets of baking parchment. You could use greaseproof paper but you must grease it with butter/margarine.
  • Add all the ingredients except for the fruit into a large bowl. Mix well, either with a wooden spoon or a food mixer. Add half of the fruit to the bowl, mix, then add the rest of the fruit and mix again.
  • Scrape the mixture into the tin, making a slight well in the centre of the cake - this will stop the centre from rising. Take hold of the tin and tap it a couple of times onto a hard surface. This gets rid of any air bubbles.
  • Cover the top and sides of the tin with a double layer of greaseproof paper or brown paper.  Bake in the centre of the oven for two ½ hours for cake tin sizes 6 and 7 inch and three hours for cake tin sizes 8 and 9 inch.
  • To check whether the cake is done place a skewer (a knitting needle or piece of spaghetti are ideal) in the centre of the cake. If the skewer comes out clean the cake is cooked. If it’s not, return to the oven for another 30 minutes and check again.
  • Leave to cool completely in the tin. When cool pierce the top of the cake all over with a cocktail stick. Drizzle two or three tablespoons of the alcohol you used in the mixture over the cake. Wrap the cake in a double layer of greaseproof paper then a double layer of tinfoil.
  • Leave the cake for one week. Unwrap it, turn it over, then skewer and ‘feed’ the cake again. Repeat the ‘feeding’ process until one week before Christmas. Decorate it in the normal way with marzipan and the icing of your choice.
Gertie xx

Sunday 17 November 2013

A bag here, a bag there

No Christmas bunting to show you this week as I still haven’t quite finished them. However I do have some bags to show you.


I can’t take the credit for this as my mam made it for me a couple of years ago when she was at her quilting class (I think she was sick of me putting my needlework into supermarket carrier bags....).

Her poor bag kept bulging at the seams with all my needlework stuffed in it so she handed me some fabric and suggested I might like to make something with it. Well, it was more like “here, make yourself a new bag, will you !!!!”.


I really loved the style of the bag so took some rough measurements from it as this would allow me to work round the fabric pattern – I couldn’t cut a Scottie dog in half !!!! To stop the handles from flopping down I stitched four buttons at the base of each strap to keep them in place.

When my mam died I inherited all of her fabric. Some of the larger bits were destined to become charity quilts whilst some of the other bits I’d like to eventually make into a memory quilt. Three pieces of fabric caught my eye though as they would be perfect to make into bags.


I combined the two green fabrics together as there wasn’t enough to make two separate bags.


I love pockets in bags (the more the merrier....) so added a zipped pocket in the lining to keep things, like a purse and mobile ‘phone. I also made a little keyring purse and attached it to one of the straps.


I hit lucky with this fabric as it looks like strips of patchwork sewn together. To secure the fabric to the wadding I simply stitched each side of the strips. If only I could get my own patchwork strips that straight !!!


For the lining I used cream fabric as I thought anything patterned would be overkill. To stop the inside looking too plain I added a small band of the main fabric to the top of the lining and to the pocket zip. Again I attached a keyring purse to one of the straps.
 
There were some bits of fabric left so I made a set of make-up bags.


I didn’t have enough of the dark green fabric to use on all three bags so the two smaller ones are plain while the large bag is made up of patchwork squares.


For a simple decorative finish on the larger of the three ‘patchwork’ bags I stitched three horizontal and vertical lines making the illusion of squares.

Each of the two smaller sized bags has fabric lining whilst both the larger bags have waterproof lining.

As I mentioned in ‘a new beginning’ I’m setting up my own business so the green and the ‘patchwork’ bags will be going into stock ready for when I go live hopefully by October next year.

Have a great week.

Love,

Gertie xx

PS why not pop over to Handmade Monday to see what other fellow craft bloggers have been up to.

Sunday 10 November 2013

A little later than planned

Thank you for the lovely comments about my dresses in last week’s post. It occurred to me when I was reading them that I hadn't explained the reason why I had so many.

Mr Gertie and I used to organise conferences and award ceremonies/gala dinners for a national charity. Whilst Mr Gertie could simply change his tie for each event it would have been very costly for me to buy a new dress every time. So when time allowed I made them. I never paid expensive for the fabric and tried to buy patterns when they were on special offer.

I've finally finished my laptop bag. Even though I had just the wadding and lining to attach, it took forever to complete....


Unlike most laptop bags which tend to hold the laptop and nothing else I wanted somewhere to keep the power supply and mouse so designed the bag to have an extra pocket at the front.


To protect the laptop from anything else that may be in the bag with it I made a large padded pocket in the lining to keep it in. I also added another lining pocket to stop small items, like memory sticks, from getting lost in the bottom of the bag.


Have a great week.

Gertie xx

PS why not pop over to Handmade Monday to see what other fellow craft bloggers have been up to.

Sunday 3 November 2013

Here's another one I made earlier

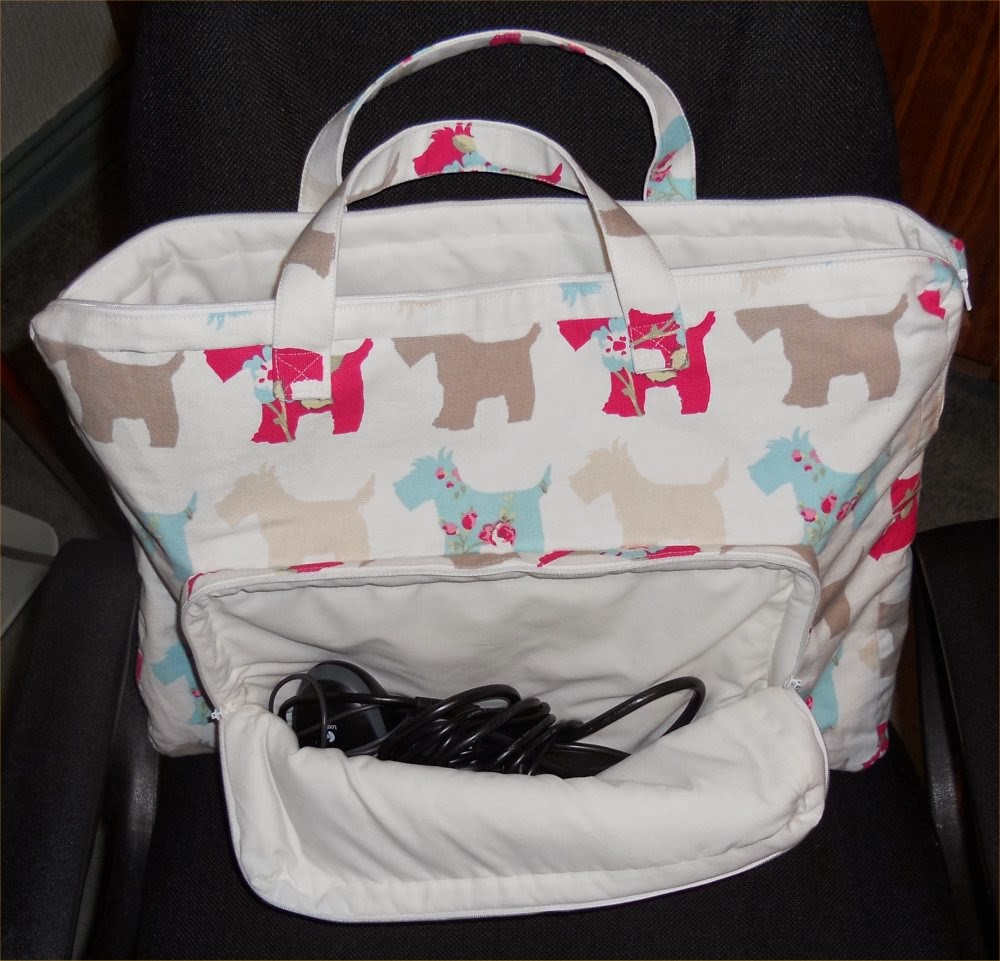
As I haven’t quite finished the laptop bag I mentioned in my last post I thought now would be a great time to show you some more of the dresses I’ve made.

Like I mentioned previously I’m a yo-yo when it comes to size, so some of the dresses have a little bit shape to them (when I was thin-ish....) and others are like a sack of potatoes!!!!!


I certainly got a really good deal with this pattern, for not only did I pay less than £1 for it, I must have made each of the three pattern styles – long length, knee length and flared knee length – two or three times.

The flared length style is my staple LBD that I’ve worn on many occasions. I love the shimmer of the fabric but it can be rather uncomfortable to wear without a full slip as the metallic thread in the fabric is very itchy. Hence, the dress always shares a hanger with the slip so I don’t forget it !!!!


This pattern came free with Prima magazine a few years ago. It was originally a wedding dress design so I simply removed the fishtail train to make it into an evening gown instead. The dress should have had spaghetti straps but I couldn’t get them to work.


Another dress during my ‘thin’ period. I loved the simplicity of the design with the unusual little bodice slit. The slit buttons came from an old pair of trousers.


Two dresses from the same pattern. I love cowls so was immediately drawn to this design. When I first used this pattern for the red/orangey dress I had quite a time stitching the front ‘V’. By the time I came to make the blue dress I had mastered it.


There is a good reason why the blue dress is a bit shorter than the other one. I had intended to make a different dress using the blue fabric but once I made the toile I really hated the style. Unfortunately all my other patterns required a lot more fabric so luckily this one saved the day – albeit with a shorter length as I ran out of fabric !!
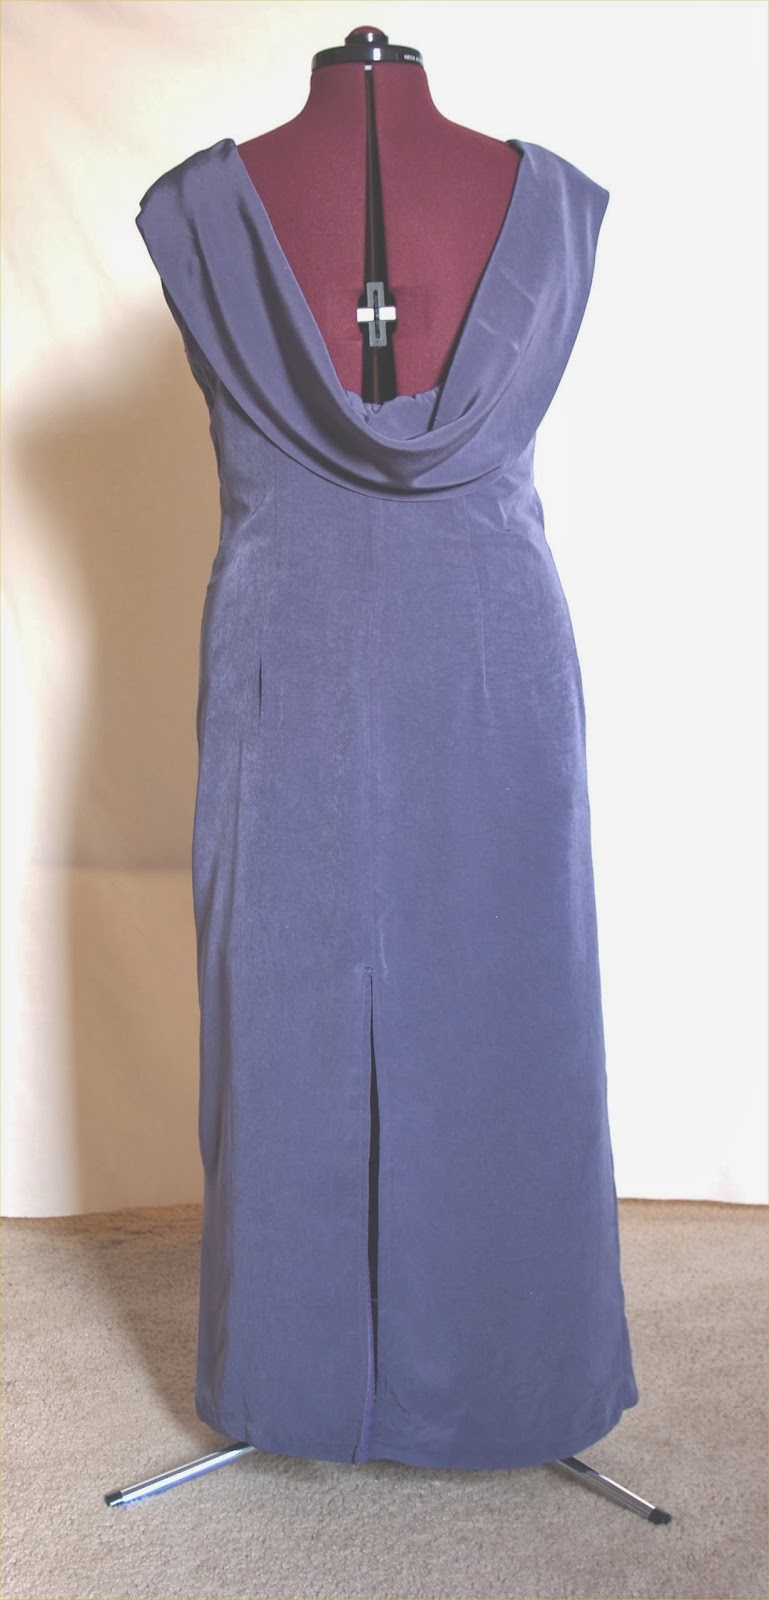


Another cowl dress – there’s a surprise !!!! I ventured away from my staple colours for this one and chose a beautiful silky lilac fabric.  Its softness made it perfect for draping the cowl.


This one is affectionately known as the ‘Slapper’ dress. My mam really hated it – and she could be quite blunt in her opinions (she once said of a dress that I looked like a pregnant duck…) – and said I looked like a ‘Slapper’ in it….


Because of its style I couldn’t wear a bra and didn’t have any toupee tape to hold down the straps, so unfortunately I had a bit of a ‘wardrobe malfunction’. I was sitting on the floor (don’t ask !!!!!!) talking to some friends on the next table (we were at a gala dinner) when one of the straps slid off my shoulder and my rather large boob fell out of the dress. When I regaled the tale to my mam she replied ‘told you so’….

And finally we come to one of my all time favourite dresses.

We went on cruise to the Monaco Grand Prix and on the Friday evening we were invited to a party at the Monte Carlo Grand Hotel. Because it was a special anniversary of a Bugatti winning the first Monaco Grand Prix, there was an optional dress code of twenties theme clothing or anything in Bugatti Blue.


As it’s not every day that you get invited to the Monte Carlo Grand I really wanted to push the boat out (no pun intended….). I found a lovely pattern – a skirt and corset style bodice – and some Bugatti Blue fabric.


I got lots of lovely comments about the dress and they were most intrigued as to where I bought it from. I had great delight in telling them it came from ‘The House of Gertie’….

Have a great week.

Gertie xx

PS why not pop over to Handmade Monday to see what other fellow craft bloggers have been up to.

Sunday 27 October 2013

Bits and bobs

I'm pleased to say that the quilts (and teddies) have gone to a new home. Sadly I didn't have any contact details for the women's shelter where my mam's quilts were originally intended so just thought I'd try and find someone who would take make use of them.

I'd found a place and was about to email them when I thought I'd try one more time on the internet to see if I could find the shelter. Still no joy, but I wasn't giving up, so rang a women's shelter here in Sunderland to see if they could help.

I briefly explained about the quilts and was totally expecting the woman on the other end of the phone to say she'd never heard of such a thing. However she replied that she knew all about them and could remember receiving quilts from my mam.

They would love to have them, and the comfort teddies as they give every child who comes into the shelter a gift, and gave me the address of the shelter where my mam's quilts would have been sent, so we could drop them off.

Whilst I would have happy for the quilts to have gone to another charity, I'm delighted to have been able to donate them to the place where they were meant to go.

Following my last post I was asked what new project I was going to do now that the quilts were finished. Being me I wasn't going to settle for just one !!!! So here's what I'm working on at the moment and what I've got planned for the coming weeks.

A laptop bag. There's still the wadding, linings and the handles to attach.


Next on the project list is some Christmas bunting. I'm making two - one with large and small snowmen and the other spelling out 'let it snow'. While I was waiting for the fabric I'd bought online to arrive I made a start on cutting out the felt snowmen and 'let it snow' letters.


Once the bunting is finished I'm planning using the left over fabric from my laptop bag and the other Scotty dog fabric to start building up a stock of bags ready for when my new business venture goes live next Autumn.


Have a great week.

Gertie xx

PS why not pop over to Handmade Monday to see what other fellow craft bloggers have been up to.

Sunday 20 October 2013

Finished !!

I've done it !! I've finally completed all of my late mam's unfinished projects.


Out of all of her projects this one was the easiest to finish as she'd done most of the work already. All I had to do was finish outlying a couple of squares and do the binding.

I'd like to think that she would be pleased with how they've all turned out. If you want to have a look at them just click on the various links: comfort teddies,  little girls quilt, little boys and baby quilt.

I certainly really enjoyed finishing them. They kept me busy during the summer whilst I was immobile from my hip op, though hand stitching a quilt on one of the hottest days of the year probably wasn't one of my brightest ideas !!

Once I've washed the quilts I'll then find a good home for them and the teddies.Whilst they may not go to the original destination that my mam had intended them to go (I don't have any contact details for the lady who was organising them) I'm sure whoever gets them will be most grateful.

Have a great week.

Gertie xx

PS why not pop over to Handmade Monday to see what other fellow craft bloggers have been up to.

Wednesday 16 October 2013

October's bake of the month

After a short break the ‘bake of the month’ returns to a new mid-week slot.


I came up with the idea of these after eating lemon muffins from a well known supermarket. Those muffins had large pieces of sugar on the top which gave it a lovely sugary crunch.

As I didn’t have any sugar cubes to crumble over the top I improvised by making a syrup using granulated sugar and lemon juice. When the sugar syrup hardened it provided a wonderful sticky lemony texture.

The muffins are best eaten within two days as the sugar top goes a little soft.


Sticky lemon muffins
Ingredients:
  • 5oz/125g caster sugar
  • 9oz/250g self-raising flour
  • 1 tsp bicarbonate of soda
  • 3oz/75g butter or margarine
  • 2 large eggs
  • 7fl oz/200ml milk
  • Grated zest of one lemon

Topping:
  • 2oz/50g granulated sugar
  • Juice of one lemon

Method:
  • Preheat oven 200ºc/Gas Mk 6. Fan oven 180ºc.
  • Using a muffin tin line 10 (or 12 if you want to make them smaller) holes with paper cases.
  • Melt the butter/margarine in a pan or the microwave then leave to cool.
  • In a bowl add all the dry ingredients and give them a quick stir.
  • Add the eggs to the milk, beat together, and then add to the melted butter/margarine.
  • Pour the liquid to the dry ingredients then gently mix until just combined. Don’t be tempted to give it one more stir as over mixing will make the muffins tough.
  • Divide the batter into the paper cases. You can use a spoon, or better still, an ice-cream scoop.
  • Bake for 15 – 18 minutes until they are golden brown.
  • Shortly before the muffins are due to come out of the oven put the granulated sugar and lemon juice into a tea cup and stir. Heat in the microwave for approx 10 seconds until all the sugar has dissolved. You can do this in a small pan over a medium heat if you prefer – I just use the microwave as it saves dirtying a pan....
  • Once the muffins are cooked, using a large pastry brush, brush the tops of the muffins with the sugar syrup.
  • Leave to cool completely so the tops can get lovely and crunchy.

Gertie xx

Sunday 13 October 2013

Another two down, only one to go

I've been busy with my mam's quilts all week. I just want them finished so I can start on my ever growing list of things to make.

When I asked my sister what mam had planned for the back of the quilts she told me that the baby quit just needed a plain backing fabric. She also gave me a tip about the binding - cut the fabric slightly bigger all round,  fold it over then stitch it down.
 
That was the theory anyway. Putting it into practice was a little different..... It would have been so much easier if I could have put the fabric and the quilt on the floor and measured it there. Unfortunately my new hip isn't agile enough at the moment to let me creep around the floor so that method was out. As my workroom table isn't big enough to lay it out flat I had to measure everything with a tape measure. Big mistake !!!!!


I measured everything twice (like the old saying measure twice, cut once) and got the same figure each time so cut out the backing fabric. However when I came to put the two bits together there wasn't enough fabric to make the folded binding. URRRRRR !!!!

When I told Mr Gertie he replied that this some times happens to him too. Has this ever happened to you? We suspect we have phantom tape measures which take great delight in moving their numbers around when we're not looking.....


Like the little girls quilt I made a reversible backing for the little boys one. Looking through my mam's stash of fabric I found something which would be perfect for a little boy, though it would have to be pieced like the girls quilts.

This time I decided to piece it in long strips, alternating between pattern and plain fabric.


Three quilts down only one to go.....

Have a great week.

Gertie xx

PS why not pop over to Handmade Monday to see what other fellow craft bloggers have been up to.

Sunday 6 October 2013

One down, three to go

My sewing machine has been busy this week stitching one of the quilts that my late mam had made a start on.


I wasn't sure what my mam had planned for the back of the quilt so rang my sister to see if she had any ideas.

'Just use what ever fabric you think goes', she suggested, 'that was what mam was going to do'.

Looking through the stash of fabric I inherited from my mam I found some pink butterfly print, which although there wasn't enough to cover the back completely, there was enough for five large squares. I teamed that up with some cream and used what was left of the main fabric to make some binding.


So, one quilt down, only another three to go !!!!

Have a great week.

Gertie xx

PS why not pop over to Handmade Monday to see what other fellow craft bloggers have been up to.