Pages

Monday 25 November 2013

November's bake of the month

No Christmas bunting to show you this week. They're finished but we didn't have time over the weekend to take any photos. They're be up next week - promise !!!!

So rather than not put a blog up I thought I'd share with you my recipe for Christmas cake. I know there are thousands of fruit cake recipes but trust me, you won't be disappointed when you try it.

This cake is perfect for making now or several months in advance. Simply 'feed' it with alcohol every three/four weeks until the end of November, then every week until you're ready to decorate it.

As this is an ancient family recipe all the weights and sizes are in 'old' money. If you want them in metric there'll be lots of sites on-line that will be able to convert it for you.

There's no photo this time. Lets be honest, one fruit cake looks very much like another.. 

Boozy Christmas cake

Ingredients of 7 inch round tin/ 6 inch square tin:
  • 7oz currants
  • 4oz sultanas
  • 2oz raisins
  • 2oz glace Cherries – chopped 
  • 2oz mixed peel
  • 2oz mixed chopped nuts
  • 2 tablespoon brandy/rum or any spirit
  • 5oz plain flour – sieved 
  • 1 teaspoon mixed spice
  • 1oz ground almonds
  • 4oz soft brown sugar
  • 4oz butter (softened)
  • 1 tablespoon black treacle
  • 3 eggs 

Ingredients for a 9 inch round tin/ 8 inch square tin:
  • 13oz currants
  • 7oz sultanas
  • 3 ½oz raisins
  • 3 ½oz glace Cherries – chopped
  • 3 ½oz mixed peel
  • 3 ½oz mixed chopped nuts
  • 3 tablespoon brandy/rum or any spirit
  • 9oz plain flour – sieved
  • 1 ¾ teaspoon mixed spice
  • 2oz ground almonds
  • 8oz soft brown sugar
  • 8oz butter (softened)
  • 1 ½ tablespoon black treacle
  • 5 eggs

Method:
  • Put all fruit in a bowl then add the alcohol. Give the fruit a good stir then leave overnight.
  • The following day preheat oven to 140º c/Gas Mk 1. Fan oven 130ºc.Line the cake tin with two sheets of baking parchment. You could use greaseproof paper but you must grease it with butter/margarine.
  • Add all the ingredients except for the fruit into a large bowl. Mix well, either with a wooden spoon or a food mixer. Add half of the fruit to the bowl, mix, then add the rest of the fruit and mix again.
  • Scrape the mixture into the tin, making a slight well in the centre of the cake - this will stop the centre from rising. Take hold of the tin and tap it a couple of times onto a hard surface. This gets rid of any air bubbles.
  • Cover the top and sides of the tin with a double layer of greaseproof paper or brown paper.  Bake in the centre of the oven for two ½ hours for cake tin sizes 6 and 7 inch and three hours for cake tin sizes 8 and 9 inch.
  • To check whether the cake is done place a skewer (a knitting needle or piece of spaghetti are ideal) in the centre of the cake. If the skewer comes out clean the cake is cooked. If it’s not, return to the oven for another 30 minutes and check again.
  • Leave to cool completely in the tin. When cool pierce the top of the cake all over with a cocktail stick. Drizzle two or three tablespoons of the alcohol you used in the mixture over the cake. Wrap the cake in a double layer of greaseproof paper then a double layer of tinfoil.
  • Leave the cake for one week. Unwrap it, turn it over, then skewer and ‘feed’ the cake again. Repeat the ‘feeding’ process until one week before Christmas. Decorate it in the normal way with marzipan and the icing of your choice.
Gertie xx

Sunday 17 November 2013

A bag here, a bag there

No Christmas bunting to show you this week as I still haven’t quite finished them. However I do have some bags to show you.


I can’t take the credit for this as my mam made it for me a couple of years ago when she was at her quilting class (I think she was sick of me putting my needlework into supermarket carrier bags....).

Her poor bag kept bulging at the seams with all my needlework stuffed in it so she handed me some fabric and suggested I might like to make something with it. Well, it was more like “here, make yourself a new bag, will you !!!!”.


I really loved the style of the bag so took some rough measurements from it as this would allow me to work round the fabric pattern – I couldn’t cut a Scottie dog in half !!!! To stop the handles from flopping down I stitched four buttons at the base of each strap to keep them in place.

When my mam died I inherited all of her fabric. Some of the larger bits were destined to become charity quilts whilst some of the other bits I’d like to eventually make into a memory quilt. Three pieces of fabric caught my eye though as they would be perfect to make into bags.


I combined the two green fabrics together as there wasn’t enough to make two separate bags.


I love pockets in bags (the more the merrier....) so added a zipped pocket in the lining to keep things, like a purse and mobile ‘phone. I also made a little keyring purse and attached it to one of the straps.


I hit lucky with this fabric as it looks like strips of patchwork sewn together. To secure the fabric to the wadding I simply stitched each side of the strips. If only I could get my own patchwork strips that straight !!!


For the lining I used cream fabric as I thought anything patterned would be overkill. To stop the inside looking too plain I added a small band of the main fabric to the top of the lining and to the pocket zip. Again I attached a keyring purse to one of the straps.
 
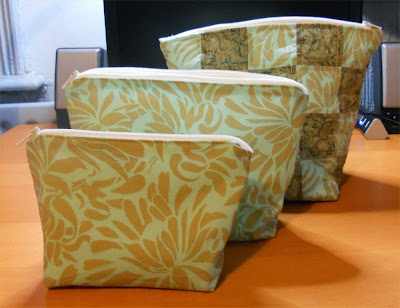
There were some bits of fabric left so I made a set of make-up bags.


I didn’t have enough of the dark green fabric to use on all three bags so the two smaller ones are plain while the large bag is made up of patchwork squares.


For a simple decorative finish on the larger of the three ‘patchwork’ bags I stitched three horizontal and vertical lines making the illusion of squares.

Each of the two smaller sized bags has fabric lining whilst both the larger bags have waterproof lining.

As I mentioned in ‘a new beginning’ I’m setting up my own business so the green and the ‘patchwork’ bags will be going into stock ready for when I go live hopefully by October next year.

Have a great week.

Love,

Gertie xx

PS why not pop over to Handmade Monday to see what other fellow craft bloggers have been up to.

Sunday 10 November 2013

A little later than planned

Thank you for the lovely comments about my dresses in last week’s post. It occurred to me when I was reading them that I hadn't explained the reason why I had so many.

Mr Gertie and I used to organise conferences and award ceremonies/gala dinners for a national charity. Whilst Mr Gertie could simply change his tie for each event it would have been very costly for me to buy a new dress every time. So when time allowed I made them. I never paid expensive for the fabric and tried to buy patterns when they were on special offer.

I've finally finished my laptop bag. Even though I had just the wadding and lining to attach, it took forever to complete....


Unlike most laptop bags which tend to hold the laptop and nothing else I wanted somewhere to keep the power supply and mouse so designed the bag to have an extra pocket at the front.


To protect the laptop from anything else that may be in the bag with it I made a large padded pocket in the lining to keep it in. I also added another lining pocket to stop small items, like memory sticks, from getting lost in the bottom of the bag.


Have a great week.

Gertie xx

PS why not pop over to Handmade Monday to see what other fellow craft bloggers have been up to.

Sunday 3 November 2013

Here's another one I made earlier

As I haven’t quite finished the laptop bag I mentioned in my last post I thought now would be a great time to show you some more of the dresses I’ve made.

Like I mentioned previously I’m a yo-yo when it comes to size, so some of the dresses have a little bit shape to them (when I was thin-ish....) and others are like a sack of potatoes!!!!!


I certainly got a really good deal with this pattern, for not only did I pay less than £1 for it, I must have made each of the three pattern styles – long length, knee length and flared knee length – two or three times.

The flared length style is my staple LBD that I’ve worn on many occasions. I love the shimmer of the fabric but it can be rather uncomfortable to wear without a full slip as the metallic thread in the fabric is very itchy. Hence, the dress always shares a hanger with the slip so I don’t forget it !!!!


This pattern came free with Prima magazine a few years ago. It was originally a wedding dress design so I simply removed the fishtail train to make it into an evening gown instead. The dress should have had spaghetti straps but I couldn’t get them to work.


Another dress during my ‘thin’ period. I loved the simplicity of the design with the unusual little bodice slit. The slit buttons came from an old pair of trousers.


Two dresses from the same pattern. I love cowls so was immediately drawn to this design. When I first used this pattern for the red/orangey dress I had quite a time stitching the front ‘V’. By the time I came to make the blue dress I had mastered it.


There is a good reason why the blue dress is a bit shorter than the other one. I had intended to make a different dress using the blue fabric but once I made the toile I really hated the style. Unfortunately all my other patterns required a lot more fabric so luckily this one saved the day – albeit with a shorter length as I ran out of fabric !!


Another cowl dress – there’s a surprise !!!! I ventured away from my staple colours for this one and chose a beautiful silky lilac fabric.  Its softness made it perfect for draping the cowl.


This one is affectionately known as the ‘Slapper’ dress. My mam really hated it – and she could be quite blunt in her opinions (she once said of a dress that I looked like a pregnant duck…) – and said I looked like a ‘Slapper’ in it….


Because of its style I couldn’t wear a bra and didn’t have any toupee tape to hold down the straps, so unfortunately I had a bit of a ‘wardrobe malfunction’. I was sitting on the floor (don’t ask !!!!!!) talking to some friends on the next table (we were at a gala dinner) when one of the straps slid off my shoulder and my rather large boob fell out of the dress. When I regaled the tale to my mam she replied ‘told you so’….

And finally we come to one of my all time favourite dresses.

We went on cruise to the Monaco Grand Prix and on the Friday evening we were invited to a party at the Monte Carlo Grand Hotel. Because it was a special anniversary of a Bugatti winning the first Monaco Grand Prix, there was an optional dress code of twenties theme clothing or anything in Bugatti Blue.


As it’s not every day that you get invited to the Monte Carlo Grand I really wanted to push the boat out (no pun intended….). I found a lovely pattern – a skirt and corset style bodice – and some Bugatti Blue fabric.


I got lots of lovely comments about the dress and they were most intrigued as to where I bought it from. I had great delight in telling them it came from ‘The House of Gertie’….

Have a great week.

Gertie xx

PS why not pop over to Handmade Monday to see what other fellow craft bloggers have been up to.