Pages

Sunday 26 May 2013

Wizzy's bag

I won’t bore you with the nitty-gritty but I use a wheelchair for quite a bit of the time (you can read the reasons why etc in another of my blogs ‘The Joint Journals’*).

Shortly before we were going on our cruise last summer Mr Gertie asked if I could make a bag what would fit on the back of Wizzy (my wheelchair).

When we were on a cruise the previous year Mr Gertie not only had to push Wizzy but also carry a rucksack so thought maybe Wizzy could do some of the carrying this time around...

Mr Gertie took Wizzy’s vital statistics then I set about making a bag that would fit on the back of Wizzy.

As Stickies, my elbow crutches, would also be at the back of Wizzy, I had to make sure that the bag would sit ok with them.

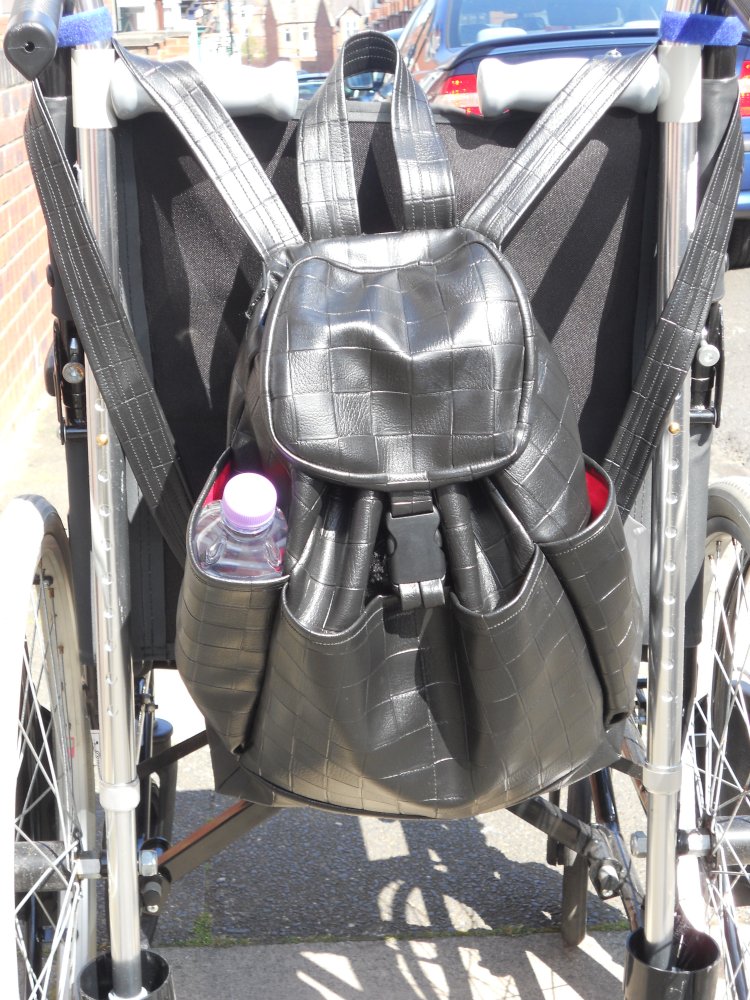
 I based the design of the bag on a rucksack. It would have a long body to accommodate four large pockets at the front and sides. These pockets would be used to hold things like bottles of water (handy for heat in the Mediterranean). 

I also added an inside zipped pocket into the lining so we could keep things safe, like passports etc. For ease I fixed the length of the handles. 

The fabric for the rucksack needed to be hardwearing and waterproof so decided on leatherette, black weave patterned to be exact, with red cotton fabric (for a bit of brightness) for the lining.


I’d never sewn with leatherette so had to do a little research beforehand. Not been able to press the seams open (the iron would melt the fabric....) was a problem so I just had to finger press them and hope for the best!!!!

I was a lot slower at machine stitching the pieces together as mistakes could not be unpicked because the needle left a hole in fabric. The same thing applied to pins so had to use paper clips, pegs and tape to hold the pieces together.

It was a bit of a challenge using leatherette for the first time. However overall I’m happy with how Wizzy’s bag came out – and so too is Wizzy!!!

Have a great week.

Gertie xx

PS pop over to Handmade Monday to see what other fellow craft bloggers have been up to.

*I also have ‘The BOGOF Blog’ which I share with Mr Gertie

Sunday 19 May 2013

Knit one, purl one

In last Sunday’s blog I mentioned the jumper I had hoped to show you but unfortunately it wasn’t finished. Well it is now.....


The pattern I used comes from a book that’s ancient – the models are wearing legwarmers!!
However if you look past the early 80’s fashion disaster some of the patterns are really good. 

I remember my mam knitting this jumper back in the day and when she found out I was going to knit it again she hinted madly that she would love to have it when it was finished. Sadly that wasn’t to be as she died in March. However I’m sure she would have loved it.

The main part of the jumper was easy to knit as it was just stocking stitch. The fun though began with the yoke. It was supposed to be knitted over four needles but I used a circular needle instead.

I’ve only used a circular needle once before, and that was many moons ago, so getting back into the swing of knitting with it took a while.  


The yoke itself was only 42 rows but it probably took longer to do than knitting the stocking stitch pieces.

When it came to knitting the neckband I did eventually have to use four needles as I didn’t have a circular needle small enough.

This is only the second jumper I’ve knitted in a long time (I’ll pop the first one up on the blog shortly) so I was really pleased with how it turned out.

Have a great week.

Gertie xx

PS pop over to Handmade Monday to see what other fellow craft bloggers have been up to.

Sunday 12 May 2013

Scrappy bag


I had hoped today’s blog would be a jumper I’ve been knitting. However as I haven’t quite finished stitching the pieces together that will have to wait until next week.

So instead I thought I’d show you a rucksack I made last year. The design comes from Susan Briscoe ‘21 sensational patchwork bags’ book. If you love making bags, check out her books as they’re brilliant.


It was only after I’d stitched the length of strips together did I realise that I had forgotten to add the seam allowance. Opps!!!! They should have been 1 ½ inch wide, instead of 1 inch wide.

Thankfully all I needed to do was add a couple more extra strips to each panel. Note to one’s self – remember to double check seam allowances in future…..


I then made patchwork blocks for the front and side pockets.


For the front of the flap I hand stitched a fabric star to the quilted strip panel.


As I’m not very good with a hammer I asked Mr Gertie to insert the eyelets around the top of the band. To neaten the ends of the cord I stitched little ‘bells’ to them.


After giving the rucksack its first outing I felt it needed a zipped pocket inside the bag. I cut into the lining (that was the scary part in case I’d made a mistake!!!!) then added the pocket.

With the exception of the eyelets, the rucksack was made using recycled material. The strips and patchwork blocks came from old shirts or scrap bits of fabric. The base, eyelet band, cord, binding and straps came from a trouser suit I’d made many moons ago, and the lining came from an old pair of light blue trousers. 

I'm really pleased with how it came out and it just goes to show what can be made simply by using scraps...

Have a great week.

Gertie xx

PS pop over to Handmade Monday to see what other fellow craft bloggers have been up to.

Sunday 5 May 2013

Gerry the Kitchen Aid

Gerry's cover
I’ve always dreamed of having Kitchen Aid.  To me they’re not just food mixers; they are a work of art. However they are also very expensive...

My dream came true, as following a bonus at work, Mr Gertie very kindly bought me one.

The first thing I did was to name it. We like to give things names – our plants are called Eric, Ernie and Ethel; we have a 12 year old Christmas tree called Bruce; the dishwasher is called the Sweetie Monster. Yes I know we are really sad!!!!!

At first I was going to called it Hilda (after Hilda Baker. Baker, food mixer – see the connection). However it just didn’t fit because the Kitchen Aid is blue and blue is traditionally a boy’s colour.

Gerry the Kitchen Aid


So Mr Gertie suggested I called it Gerry (after Gerry Raffity who wrote Baker Street).

For the first couple of weeks Gerry stood proudly on the kitchen worktop. However I knew he’d get dusty so decided to make him a cover.

Instead of making the cover out of scrap material, like I did with my sewing machine cover, I actually wanted to buy some fabric!!!!!

I wanted the fabric pattern to be either something to do with baking/the kitchen or food of some kind. After looking through several websites I finally managed to get the choice down to two – chocolate sweets or baking paraphernalia. I couldn’t make my mind up so asked Mr Gertie. He chose the baking fabric.

The pattern design was perfect for hand quilting so I had fun outlining the various shapes.  The only problem was when to stop as hand quilting can be very therapeutic.

Quilted gingerbread men & a cookie duck!!

It’s loosely fitting over the mixer as I wanted room to hide the cable and plug at the back. The real reason is I measured it wrong!!!!!

Have a great week.

Gertie xx

PS pop over to Handmade Monday to see what other fellow craft bloggers have been up to.

Saturday 4 May 2013

May's bake of the month


When I saw a recipe for an orange cake that used the whole orange and not just the zest, I had to try it.

It’s not a cake that you can simply make in minutes as the orange has to boil for an hour, cool and then blitzed in a food processor.
 

As the recipe uses more ground almonds than self-raising flour, don’t expect the cake to rise very much. However what it lacks in size, it more than makes up for in flavour.

The orange theme continues in the topping as orange juice is used to make the icing. Instead of freshly squeezing an orange, you could use concentrated orange juice (the kind you drink at breakfast).


Whole Orange Cake

Ingredients:
  • 1 small orange
  • 5oz/125g caster sugar
  • 3 large eggs
  • 3oz/75g self-raising flour
  • 4oz /100g ground almonds
  • 2oz/50g margarine or butter, melted

Topping:
  • 3oz/75g icing sugar, sieved
  • Orange juice (either freshly squeezed or from a carton)

Method:
  • Put the orange in a small pan and add enough cold water until it just covers the orange. Bring to a boil and then turn down the heat until the water is simmering. Cover with a lid then leave to simmer for one hour. Remove the orange from the pan then let it cool.
  • Pre-heat oven 180/Gas Mk 4. Fan oven 160Âșc.
  • Line an 8 inch round tin with either a non-stick liner or baking parchment.
  • Roughly chop the cooled orange, discard the pips, then whizz in food processor until smooth.
  • Using a hand or electric mixer, whisk the sugar and eggs until light and fluffy.
  • Sift the flour and almonds into the egg mix then gently fold to combine.
  • Next add the orange puree and melted butter, and again, fold gently until just mixed.
  • Pour the batter into the tin and bake for 40-45 minutes until the top of the cake springs back when lightly pressed.
  • Cool in the tin for 5 minutes before turning out onto a wire rack to cool completely.
  • For the topping mix the icing sugar with enough orange juice to make a smooth pouring consistency then drizzle over the cake.
Gertie xx