Pages

Showing posts with label Dressmaking. Show all posts

Sunday, 1 June 2014

Come in number two

Just a quickie post this time as I’ve got a pile of new trousers which need their hems taking up ready for our forthcoming cruise – the curse of both myself and Mr Gertie being on the short side !!!!

Sorry there was no blog last week. Shortly after my last post I came down with one of those mega heavy colds that really take the wind out of your sails. Consequently that put my sewing out of action so I had a lot of catching up to do if I wanted to get my dress finished for our holiday.

Having burnt the candle at both ends dress number two is finally done. Yippee!!!

If you’ve been following my cruise dress adventures you may remember that my second dress pattern choice didn’t go according to plan. I did have number three pattern in reserve; however that didn’t go to plan neither.... The place where I ordered it from kept sending me the wrong size. Rather than find somewhere else to purchase it from, I took it as a sign that I wasn’t meant to make that particular dress.

Because time was running out I just decided to re-use one of my old patterns. I had to make the pattern a little bigger as I’ve put a few pounds in weight (middle age spread – that’s my excuse and I’m sticking to it....). Plus the dress needs to be a little loose as I’ll be using Stickies to walk with and can’t have anything too tight around the arms.


The beauty of a toile is your fabric doesn’t have to match....


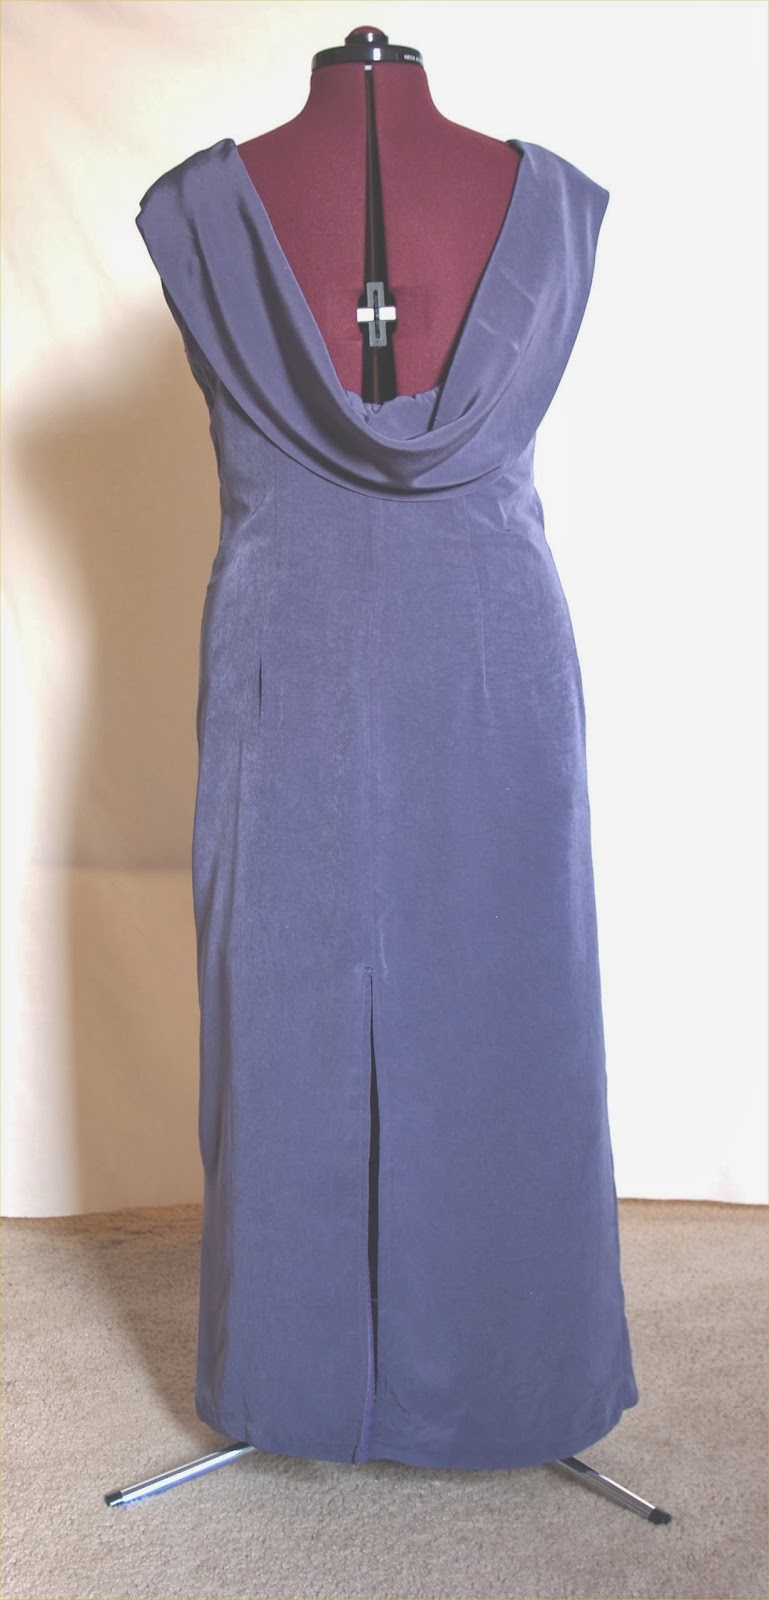
 Unlike the original dress which was floor length this time I’ve gone for a shorter hem. Whilst it looks like a sack of potatoes on Gertie it does look better on me.....


Have a great week.

Gertie xx

PS why not pop over to Handmade Monday to see what other fellow craft bloggers have been up to.

Sunday, 4 May 2014

Done and dusted

I’ve finally finished the first of my cruise dresses.


It seems like it’s been going on forever !!! I don’t usually take this long to make a dress, it’s just with Mr Gertie finishing work recently, we’ve been having lie-ins and getting out and about. Plus while I’ve been sewing instead of listening to music, I put my DVD’s on. Bad move as I ended up watching them....

Even though I had worked the size and fit out from the toile, after cutting out the pattern pieces from the dress fabric I tacked them together instead of machine stitching.

This was the first time I’d seen how the dress would look in the fabric and as the toile was made up from any old material, it was always going to drape differently. As it happened the two back side pieces needed to be taken in slightly.


Before cutting out the front pleat panel I altered it again (just a slight reshaping at the sides) and tried it for size next to the dress fabric. The contrasting in colours looked really good, so much so, that Mr Gertie even suggested I do something like that if I make the dress again.

After what seemed like endless toile fittings and alterations, the time had come to machine stitch the dress together.


As far as the pattern was concerned the dress should be finished. However I decided to put a lining in it. I don’t do it for all the dresses I make – wearing a simple slip is just as good – but in this case I thought it would be worth doing.

There was rather a lot of hand sewing involved and as I like to try and make my stitches as small and neat as possible, it took quite a while.

It’s been a long haul to get there but I’m really pleased with it. Now it’s the turn of number two....

Have a great week.

Love,

Gertie xx

PS why not pop over to Handmade Monday to see what other fellow craft bloggers have been up to.

Sunday, 6 April 2014

Toile fitting part 4


Having established in last week’s post what the problem with the dress was the front pleated panel, I removed some of the excess fabric. As you can see it’s fitting ‘Gertie’ much better now.

Just to be on the safe side I did try it on myself as I was little concerned that having taken away some of the fabric from the bust it would be too tight. I’m pleased to say it fitted fine.


I then reshaped the collar to get rid of the excess folds, and that too is fitting much better than before.


Now that all the problems had been sorted and the fit was fine on me, I could then make a start on altering the paper pattern pieces. Magazine supplements which come with the weekend newspapers are perfect for this as they’re wider than A4 paper, and unlike newspaper, doesn’t get your hands, or the fabric, all inky.


When it came to altering the front pleat panel I decided it would be safer not to cut off the excess paper (just in case I need to make any last minute adjustments later) and simply snipped then folded back the peices, securing it down with paper clips.


Because the collar had been completely reshaped I had to make a new pattern piece for that.


That’s it, this toile is now finished.  It’s been a lengthy journey but I hope when the dress is made, it will have been worth it.

Now, about the other toile, the one with the cowl neck. I’ve decided to abandon that pattern. After doing the various fitting adjustments, it just didn’t look right, and as Mr Gertie said, I wouldn’t be happy with it. I’m gutted as I really did like the dress.

That’s what toiles are for, to iron out any problems before cutting things out using your main fabric. It’s far better to find out now that something isn’t right than ruining your expensive cloth.

I’m still going to keep the pattern, as with a bit of reworking, and me losing some weight, I think it could work.

As I’ve set my mind on making two frocks for our cruise I’m just going to make a dress from a pattern that I’ve made before.

Why don’t I just use other pattern that came in second place? I’ll tell you next week....

Have a great week.

Love,

Gertie xx

PS why not pop over to Handmade Monday to see what other fellow craft bloggers have been up to.

Sunday, 30 March 2014

Toile fitting part 3

Now that the extra seam strips of fabric have been attached to the various pieces, the toile could then have another fitting on ‘Gertie’ my tailors dummy.


Before I started working on the toiles Mr Gertie gave me a hand to measure my ‘vital statistics’ so I could then transfer the figures onto my tailors dummy.

Using an up-to-date bra I filled it with lots of toy stuffing to replicate my rather large bust then secured wadding around the waist and tum to represent my spare tyres... 

 
 Having roughly pinned the toile together beforehand I was then able to reposition them so it fitted better on ‘Gertie’.


Once I was happy with the fit I marked the pin lines with tailors chalk so I could tack the seams ready for another fitting on ‘Gertie’.
 

I added the collar this time, as having altered the front of the toile I needed to see how that looked.


As you can see by the way the collar is folding, it needs to be reshaped. I also noticed that the left front side (if you’re looking straight at it) wasn’t sitting on the bust compared to the right side. This puzzled me as I measured both front sides and they were about the same size, so I couldn’t understand why it wasn’t fitting right.

I tried the toile on myself just in case ‘Gertie’s bust’ wasn’t sitting straight. The results, however, were still the same.

I asked Mr Gertie if he could take a look (a fresh pair of eyes and all that) and he suggested that there appeared to be too fabric in the front pleat panel. If I made that panel smaller just on the left side then hopefully that will bring the left bust up.

I bet May and Patrick don’t have this much trouble !!!!!

Have a great week.

Love,

Gertie xx

PS why not pop over to Handmade Monday to see what other fellow craft bloggers have been up to.

Sunday, 23 March 2014

Toile fitting part 2

After establishing what needs to be altered on my toiles I deconstructed them ready to add the extra pieces on the seams.

Thankfully the seams had only been tacked in so they came out really easy. I only machine stitch the seams once I’m happy with the fit.

As I don’t know how much extra I need to increase the seams by I over estimated the amount required – in this case two inches – so I know I won’t forget the seam allowance. Once bitten, twice shy....


Normally when you stitch two bits of fabric together it’s rights sides together etc. Not this time. I need to be able to transfer the measurements from the toile directly to the paper pattern so I laid the add-on bits under the main pieces then zigzag stitch them in place.

It’s not pretty to look at, what with all the raggy bits, but as it's a test garment, it doesn't matter.

The next step will be to pin the toiles onto ‘Gertie’ my tailor’s dummy so I can fit the seams.

Have a great week.

Love,

Gertie xx

PS why not pop over to Handmade Monday to see what other fellow craft bloggers have been up to.

Sunday, 16 March 2014

Toile fitting part 1

Having finished the boring task of cutting out the paper patterns for two dresses I'm making for our cruise in June, I made a start on the toiles.

As I don't have a perfect figure, a toile, or test garment, is a must as there's always things on the pattern that need altering. Sometimes the changes can be straight forward like taking in the seams or more complicated like re-working a bodice.

Dressmaking books tell you to use either muslin or calico fabric to make your toile. I don't. I find calico too stiff to work with and muslin too expensive so I use sheeting instead. Not only is it extra wide but it's also cheap.

For these toiles I'm using sheeting that came from a king size duvet cover - Dunelm Mill had a sale on so I got it for £5....


What's the verdict on this toile? The side seams need to be let out a little; the back seam needs to be taken in (I have a very small back); the front needs lifting as it's sitting too low and the bust seams need to be made bigger (I've got big boobs....).


 And the verdict on this one? The side seams and the seam across the bum needs to be let out; again, the back needs to be taken in; the front is too low (even for me and I don't mind showing a bit of cleavage !!!); the sleeves are too big and I'd like the length to be a little longer.

Other than that, they're perfect......

Have a great week.

Love,

Gertie xx

PS why not pop over to Handmade Monday to see what other fellow craft bloggers have been up to.

Tuesday, 11 March 2014

Sunday, 2 March 2014

And the winner is.....

Many thanks to everyone who voted for their favourite dress in last Sunday's post. The results are in and I can now reveal the top three.

In third place:

In second place:


And in first place:


Off to buy the patterns (the joy of internet shopping.....) and then the real fun begins, choosing the fabric !!!!!

Have a great week.

Love,

Gertie xx

PS why not pop over to Handmade Monday to see what other fellow craft bloggers have been up to.

Sunday, 23 February 2014

The magnificent seven

Many thanks for your lovely comments following my oilcloth tutorial last week – and thanks for being so gentle with me.....

As you may have read in my posts 'Here's one I made earlier' and 'Here's another one I made earlier' I make my own frocks. Being rather short shop bought dresses are always way too long and I begrudge paying for a dress only to lob off six inches of fabric. 

We’re off on another cruise in June and as there will be two formal evenings I always try and make at least one cocktail dress per cruise. I’ve scoured the various pattern websites for dress patterns and I’ve finally come up with a shortlist.

As I’m a self taught dressmaker I’ll tackle anything so it makes no difference if the pattern is for beginners or advanced, I buy it simply because I like it. There have been times though when I’ve ‘improvised’ or done it my own way to make things easier. May and Patrick from the Sewing Bee would be horrified !!!!

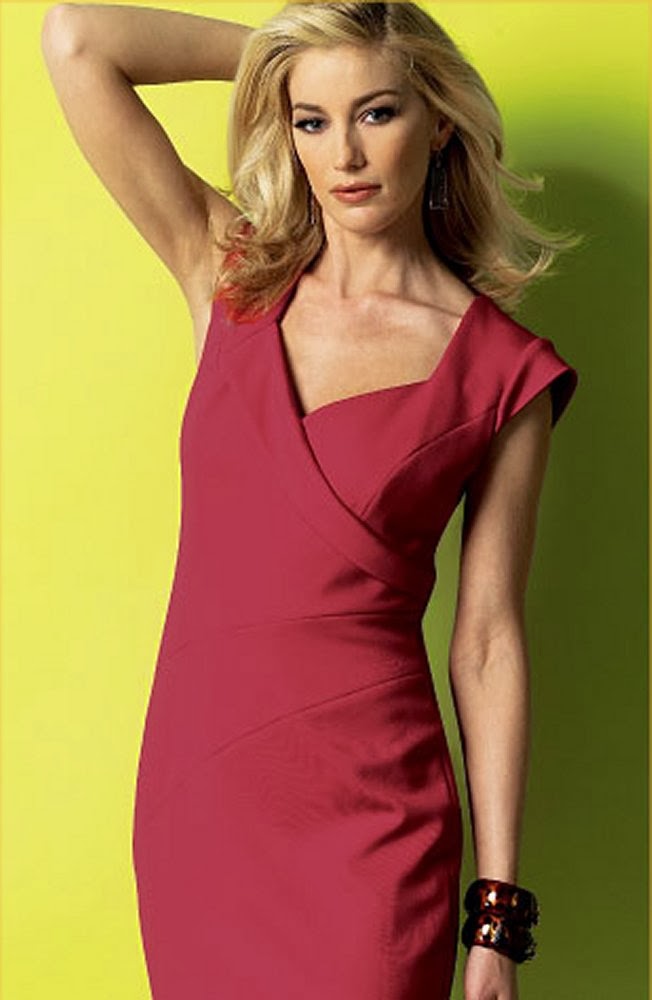
Here’s the final seven. I’ll definitely be making one, possible two, but I can’t decide on which one.  Which one would you choose?


Have a great week.

Love,

Gertie xx

PS why not pop over to Handmade Monday to see what other fellow craft bloggers have been up to.

Sunday, 3 November 2013

Here's another one I made earlier

As I haven’t quite finished the laptop bag I mentioned in my last post I thought now would be a great time to show you some more of the dresses I’ve made.

Like I mentioned previously I’m a yo-yo when it comes to size, so some of the dresses have a little bit shape to them (when I was thin-ish....) and others are like a sack of potatoes!!!!!


I certainly got a really good deal with this pattern, for not only did I pay less than £1 for it, I must have made each of the three pattern styles – long length, knee length and flared knee length – two or three times.

The flared length style is my staple LBD that I’ve worn on many occasions. I love the shimmer of the fabric but it can be rather uncomfortable to wear without a full slip as the metallic thread in the fabric is very itchy. Hence, the dress always shares a hanger with the slip so I don’t forget it !!!!


This pattern came free with Prima magazine a few years ago. It was originally a wedding dress design so I simply removed the fishtail train to make it into an evening gown instead. The dress should have had spaghetti straps but I couldn’t get them to work.


Another dress during my ‘thin’ period. I loved the simplicity of the design with the unusual little bodice slit. The slit buttons came from an old pair of trousers.


Two dresses from the same pattern. I love cowls so was immediately drawn to this design. When I first used this pattern for the red/orangey dress I had quite a time stitching the front ‘V’. By the time I came to make the blue dress I had mastered it.


There is a good reason why the blue dress is a bit shorter than the other one. I had intended to make a different dress using the blue fabric but once I made the toile I really hated the style. Unfortunately all my other patterns required a lot more fabric so luckily this one saved the day – albeit with a shorter length as I ran out of fabric !!


Another cowl dress – there’s a surprise !!!! I ventured away from my staple colours for this one and chose a beautiful silky lilac fabric.  Its softness made it perfect for draping the cowl.


This one is affectionately known as the ‘Slapper’ dress. My mam really hated it – and she could be quite blunt in her opinions (she once said of a dress that I looked like a pregnant duck…) – and said I looked like a ‘Slapper’ in it….


Because of its style I couldn’t wear a bra and didn’t have any toupee tape to hold down the straps, so unfortunately I had a bit of a ‘wardrobe malfunction’. I was sitting on the floor (don’t ask !!!!!!) talking to some friends on the next table (we were at a gala dinner) when one of the straps slid off my shoulder and my rather large boob fell out of the dress. When I regaled the tale to my mam she replied ‘told you so’….

And finally we come to one of my all time favourite dresses.

We went on cruise to the Monaco Grand Prix and on the Friday evening we were invited to a party at the Monte Carlo Grand Hotel. Because it was a special anniversary of a Bugatti winning the first Monaco Grand Prix, there was an optional dress code of twenties theme clothing or anything in Bugatti Blue.


As it’s not every day that you get invited to the Monte Carlo Grand I really wanted to push the boat out (no pun intended….). I found a lovely pattern – a skirt and corset style bodice – and some Bugatti Blue fabric.


I got lots of lovely comments about the dress and they were most intrigued as to where I bought it from. I had great delight in telling them it came from ‘The House of Gertie’….

Have a great week.

Gertie xx

PS why not pop over to Handmade Monday to see what other fellow craft bloggers have been up to.

Sunday, 28 April 2013

Here’s one I made earlier

In last week’s blog I explained about the satchel I made from various cocktail and evening dresses fabric.  For this week’s blog I thought I’d show you the actual dresses where the fabric came from.

I’m a yo-yo when it comes to size, so some of the dresses have a little bit shape to them (when I was thin-ish....) and others are like a sack of potatoes!!!!!


I think I paid less than £1 for this pattern as it was ‘last season’ when I bought it several years ago.  There are three pattern styles – long length, knee length and flared knee length – and I must have made each two or three times. The black crepe fabric worked really well, though it did fray quite a bit.


Sack of potatoes time..... I’m afraid Gertie my tailors dummy isn’t doing this dress any justice. I can assure you that it DOES look a lot better on me – and that’s saying something !!!! I loved the fabric but it was horrible to work it. Because it was so silky it wouldn’t stay still so cutting it out and stitching were a nightmare. 


 Your eyes do not deceive you. The hem of the dress isn’t straight. The problem occurred because whilst Gertie looked like she was standing level on my work room carpet, she was anything but. It was only after I’d finished it that my mam spotted the mistake. There wasn’t time to alter it so I just pretended it was meant to look like that. We solved Gertie’s problem with a piece of wood and a spirit level...


One of my thin period dresses. What caught my eye about this pattern was the bodice front. I wore this at a dinner event where large screens and overhead cameras were dotted around the ballroom. Unbeknown to me I was sitting underneath one of the cameras. Everyone in the room got several good views of my cleavage as the camera man thought I was great entertainment….


This is one of my all time favourite dresses. Again, it was during my ‘thin period’ so Gertie does look like she has a bit of a waist. I loved the way the back drape hangs.

And finally as it’s my wedding anniversary tomorrow (18 years. Gosh where has the time gone.....) I thought I’d include my wedding dress.


This, along with the three bridesmaids dresses, is the biggest dressmaking project I’ve ever done. The total cost of all the fabric and trimmings for the wedding and bridesmaids dresses came to just £320. Peanuts compared to how much wedding dresses cost nowadays !!!!

I think it took about three months to make all the dresses. I would have liked the bow at the back of the dress and the train a little bigger. However I was out voted two to one by my mam and godmother…

Have a great week.

Gertie xx

PS pop over to Handmade Monday to see what other fellow craft bloggers have been up to.