Pages

Wednesday, 31 December 2014

Happy New Year


"Take a leap of faith and begin this wondrous new year by believing. Believe in yourself. And believe that there is a loving Source - a Sower of Dreams - just waiting to be asked to help you make your dreams come true." -- Sarah Ban Breathnach, author

I wish you a very happy and peaceful new year

Gertie xx

Wednesday, 24 December 2014

Seasons greetings


Here's wishing you a very merry Christmas and a happy New Year.

Gertie xx

Friday, 12 December 2014

December's bake of the month


I fancied making a lemon cake but on no account was it to have the word ‘drizzle’ in it!!!!

Don’t get me wrong I love a lemon drizzle cake. However it just seems that every recipe for lemon cake is a ‘drizzle cake’. I wanted to do something different for a change.

I flicked through my various recipe books and came across something from the Good Food magazine which sounded promising. It didn’t have ‘drizzle’ in the title so that was a good start....

The recipe was for a citrus poppy cake. I’ve only ever used poppy seeds in bread making so thought it would be interesting to see who they tasted in a cake.

It didn’t disappoint. The citrus really hits you and the poppy seeds gave it a lovely nutty taste. It would also work brilliantly with just lemon or orange.

I’m a big fan of licking the bowl clean. It’s one of the perks of baking. However on this occasion I would strongly recommend you don’t. The batter mix is horrible!!!!


Citrus poppy cake 
(adapted from a Good Food recipe)

Ingredients:
  • 6oz/150g butter/margarine, softened
  • 6oz/150g caster sugar
  • 3 large eggs
  • 9oz/250g self-raising flour
  • 2oz/50g poppy seeds
  • Zest of 2 oranges and 2 lemons
  • 4 rounded tbsp of natural yoghurt
  • Icing sugar (optional)

Method:
  • Line a 2lb loaf tin. I use Lakeland’s cake liners but you could use baking parchment.
  • Pre-heat oven to 150º c/Gas Mk 2. Fan oven 130ºc.
  • Put all the ingredients into a bowl and mix everything together until smooth.
  • Pour the batter into the loaf tin and level the top.
  • Bake for 40 – 45 minutes until golden brown. To check to see if it’s cooked gently press the surface of the cake with a finger. If it springs back it’s done.
  • Leave the cake to cool slightly in the tin before turning out onto a wire rack.
  • Once the cake has cooled completely you can serve it as it is or dust the top with sieved icing sugar.

Sunday, 7 December 2014

Crosses before my eyes

For the past few years I’ve made it a little tradition of cross stitching a Christmas card (or two).  Here are this year’s offerings.


There is another one nearly completed. I’ve just got to finish the backstitching so that should be ready for the big day.

These are previous year’s cards.


Things have been really slow with ‘Gertie’s Bags’. When it was first open for business on Folksy a month ago I did get a few hits and a couple of ‘likes’, but sadly that’s tailored off.  I also tried the eBay market with a small number of make up bags, but again nothing. I’m not giving up as I know it can take a while to get established.

Having read books on starting your own craft business social network seemed to be very big in promoting yourself. That maybe my downfall as other than blogger and, more recently, pinterest, I don’t use any of the others.

I do have a facebook page (I was persuaded into getting one by my friends) but I never use it. I just can’t see why you’d want to tell the world ‘I’m in a restaurant eating a bowl of spaghetti and here’s a picture of it’ or ‘I’m doing the weekly grocery shopping in ASDA’..... 

Got any tips for a social network phobic!!!!

Have a great week.

Gertie xx

PS why not pop over to Handmade Monday to see what other fellow craft bloggers have been up to.

Sunday, 23 November 2014

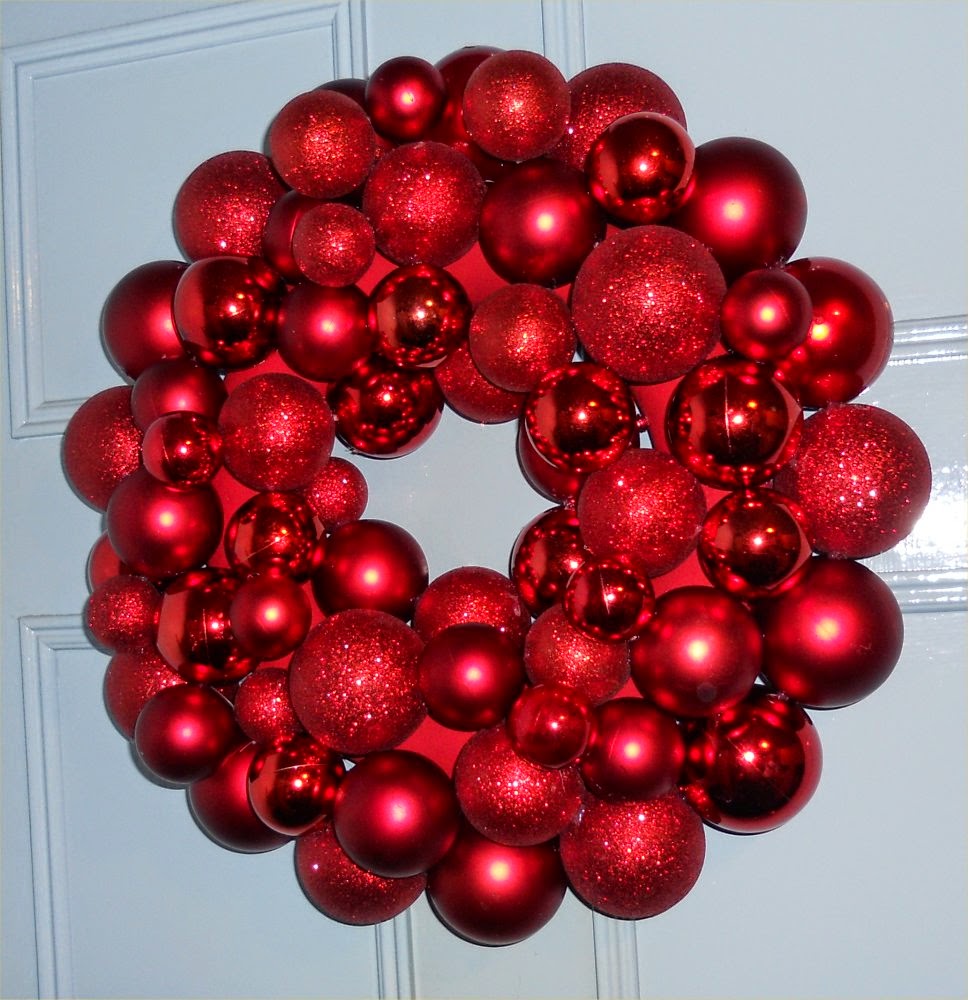
Christmas bauble wreath

I was having a think about what Christmas decorations I could make this year. I didn’t fancy making anything with fabric so had a look around on pinterest for ideas. There were some lovely things to make but one really caught my eye, a bauble wreath.

There appeared to be two different methods of constructing a bauble wreath – using a wire coat hanger or a polystyrene wreath. It was pretty much a toss of a coin as to which one I’d go with but in the end the polystyrene method won.

Here’s what I did.

First of all you’re going to need a polystyrene ring. They come in various sizes and rounded or half rounded. Mine was 12in/30cm and half rounded but use whatever you wish. I bought mine from Amazon but you’ll probably find them in places like Dunelm Mill, Hobbycraft or eBay.


You can skip this bit if you like but I painted my ring as I was concerned about the white showing through. I used a tester pot of matt emulsion paint from B&Q (other DIY stores are available.....) but children’s poster paint would work just as well.

Next you’re going to need a hot glue gun and some baubles. I have to confess I did have to buy a glue gun as we didn’t have one. However they’re not expensive. I got mine from eBay for £5.45 – free p&p and 50 sticks of glue which I thought was really good value. Having now seen how good it is, it will certainly be used a lot around the Gertie household.


I did a bit of research on google and found that the various ‘pound’ shops and supermarkets were offering good deals on baubles. Mine came from Tesco (£5 for a box of 40 mixed sizes) but that was simply because we happened to be shopping there.

The tricky bit – how many baubles to use? Of the two boxes I bought I had 16 of the really small ones left. However if you’re using just small baubles then you’ll probably need about 100. If you have any left just put them on the tree.....

With your fingers or a pair of pliers pull off the metal ends from the baubles. You can either remove them all at once or just as you need them. They’re really easy to put back on though.


Now for the fun!!!! Start with the inner and outer edges of the ring first. If you have mixed sizes of baubles keep the really big ones for the outer edge. Have a practice fit first in the centre to see how it looks, especially if you have baubles of mixed sizes as you may need a smaller one to complete the circle. When you’re happy then it’s time to start gluing.

Because the glue gun can dribble a little you may want to put some newspaper down to protect your table or work surface. Put a bit of glue on the tip of the bauble where the metal hook used to be then attach it to the ring, holding it in place for a couple of seconds. Do the same with the next one then put a dab of glue in-between the baubles to help secure them. Continue until both the inner and outer edges are done.


Next fill the space between the outer and inner edges with baubles. If you’re using mixed sized baubles the small ones are ideal for filling in any gaps.

All you need to do now is attach a hook to the back of the wreath then put on a door and admire your handiwork....


Remember at the beginning of the post I said it was a toss-up as to which method I’d use to make the wreath. Here’s the other way.

Take a wire coat hanger and shape it into a circle. Untwist the top of the hanger so it comes apart. Thread the baubles onto the wire then re-twist the top of the hanger to secure them. Finally snip off the hook with some wire cutters or leave it as it is, then cover with some ribbon.

Have a great week.

Gertie xx

PS why not pop over to Handmade Monday to see what other fellow craft bloggers have been up to.

Sunday, 16 November 2014

The return of the bake of the month


Having been very remiss about not posting any bakes since March I thought it was time to put that right.

To make amends how about a fabulously moist chocolate cake with a chocolate topping? Your very own jaffa cake....

My version of a jaffa cake has orange syrup added to it as soon as comes out of the oven. I know what you’re thinking – won’t this make the cake heavy. Normally it would but not if you start off with a very light sponge.

To make this very light sponge I’m not going to tell you how much flour, butter/margarine or sugar to use. Don’t worry this isn’t a Bake Off technical challenge!!

To determine the weight of the other ingredient you first have to weigh the eggs. Take your eggs, still in their shells and put them on the scales to find out how much they weigh. This recipe is using three eggs but it will work exactly the same for two eggs, four eggs etc.

Let’s say my three eggs weigh 6 ¾ oz’s (I’m an old fashioned girl so always work in oz’s but you could use grams instead). Measure out 6 ¾ oz’s of self-raising flour, margarine/butter and caster sugar. No matter what the eggs weigh, always use the same weight for the flour, margarine/butter and sugar


 Jaffa cake

Ingredients:
  • Margarine/butter
  • self-raising flour
  • 1 ½ teaspoon of baking powder
  • caster sugar
  • 3 eggs (large)
  • 1 large orange, grated

Topping:
  • The juice of half an orange
  • 2oz/50g caster sugar
  • 2oz/50g dark chocolate, broken into pieces

Method:
  • Line a 1lb loaf tin. I use Lakeland’s cake liners but you could use baking parchment.
  • Pre-heat oven to 180º c/Gas Mk 4. Fan oven 160ºc.
  • Weigh the eggs, still in their shells. Whatever the eggs weigh, that’s the amount you’ll need for the flour, sugar and butter/margarine.
  • Put the sugar and butter/margarine into a bowl. Sift the flour along with the baking power into a bowl, and then add the three eggs.
  • Beat well until everything is combined and mixture is smooth, to the point that it will drop off your spoon.
  • Pour the batter into the loaf tin and level the top.
  • Bake for 40 – 45 minutes until golden brown. To check to see if it’s cooked gently press the surface of the cake with a finger. If it springs back it’s done.
  • Just before the cake has finished cooking, put the orange juice and the caster sugar into a microwavable cup and microwave on HIGH to dissolve the sugar. You could do this in a small pan if you like. I just think the microwave is much quicker.
  • As soon as the cake is cooked take a cocktail stick and pierce the top of the cooked cake all over. Carefully spoon the orange syrup over the cake and leave in the tin to cool completely. Don’t worry if there are pools of syrup on top of the cake, it will sink in.
  • When the cake is completely cold melt the chocolate in the microwave on Medium for 1 – 2 minutes, stirring the chocolate every ten seconds after one minute has passed. Again you could do this over a pan of hot water but make sure the water doesn’t touch the bottom of the bowl.
  • Spoon the chocolate over the cake, letting it dribble down the sides and leave to set.

Tuesday, 11 November 2014

Open for business

Gertie’s Bags is now officially open!!!!

I had hoped to be up and running by the end of October. However the British weather wasn’t playing ball so the dull weather meant the bags couldn’t be photographed.

There’re only a small number of bags for sale. Sadly lack of storage space meant there isn’t the room at home for loads of stock. Plus if things don’t go well with Gertie’s business then I don’t end up with lots of unsold bags.

Before he retired Mr Gertie worked for a large multi-national retail company so he must have been bored ridged with me keep asking him questions or for advice.

One really good bit of advice from Mr Gertie was testing out the ordering process. That way, I could see the order through both as a customer and as a seller and check that everything was working ok.

On Folksy you’re able to see sold items, and as all Gertie’s Bags are unique, I simply couldn’t buy a bag then relist it. To get round that problem I put up for sale a bag I’d made ages ago and bought that one instead.

I’m pleased to say that everything worked out fine. All I need now is real customers.....

Gertie xx