I was having a think about what Christmas decorations I could make this year. I didn’t fancy making anything with fabric so had a look around on pinterest for ideas. There were some lovely things to make but one really caught my eye, a bauble wreath.
There appeared to be two different methods of constructing a bauble wreath – using a wire coat hanger or a polystyrene wreath. It was pretty much a toss of a coin as to which one I’d go with but in the end the polystyrene method won.
Here’s what I did.
First of all you’re going to need a polystyrene ring. They come in various sizes and rounded or half rounded. Mine was 12in/30cm and half rounded but use whatever you wish. I bought mine from Amazon but you’ll probably find them in places like Dunelm Mill, Hobbycraft or eBay.
You can skip this bit if you like but I painted my ring as I was concerned about the white showing through. I used a tester pot of matt emulsion paint from B&Q (other DIY stores are available.....) but children’s poster paint would work just as well.
Next you’re going to need a hot glue gun and some baubles. I have to confess I did have to buy a glue gun as we didn’t have one. However they’re not expensive. I got mine from eBay for £5.45 – free p&p and 50 sticks of glue which I thought was really good value. Having now seen how good it is, it will certainly be used a lot around the Gertie household.
I did a bit of research on google and found that the various ‘pound’ shops and supermarkets were offering good deals on baubles. Mine came from Tesco (£5 for a box of 40 mixed sizes) but that was simply because we happened to be shopping there.
The tricky bit – how many baubles to use? Of the two boxes I bought I had 16 of the really small ones left. However if you’re using just small baubles then you’ll probably need about 100. If you have any left just put them on the tree.....
With your fingers or a pair of pliers pull off the metal ends from the baubles. You can either remove them all at once or just as you need them. They’re really easy to put back on though.
Now for the fun!!!! Start with the inner and outer edges of the ring first. If you have mixed sizes of baubles keep the really big ones for the outer edge. Have a practice fit first in the centre to see how it looks, especially if you have baubles of mixed sizes as you may need a smaller one to complete the circle. When you’re happy then it’s time to start gluing.
Because the glue gun can dribble a little you may want to put some newspaper down to protect your table or work surface. Put a bit of glue on the tip of the bauble where the metal hook used to be then attach it to the ring, holding it in place for a couple of seconds. Do the same with the next one then put a dab of glue in-between the baubles to help secure them. Continue until both the inner and outer edges are done.
Next fill the space between the outer and inner edges with baubles. If you’re using mixed sized baubles the small ones are ideal for filling in any gaps.
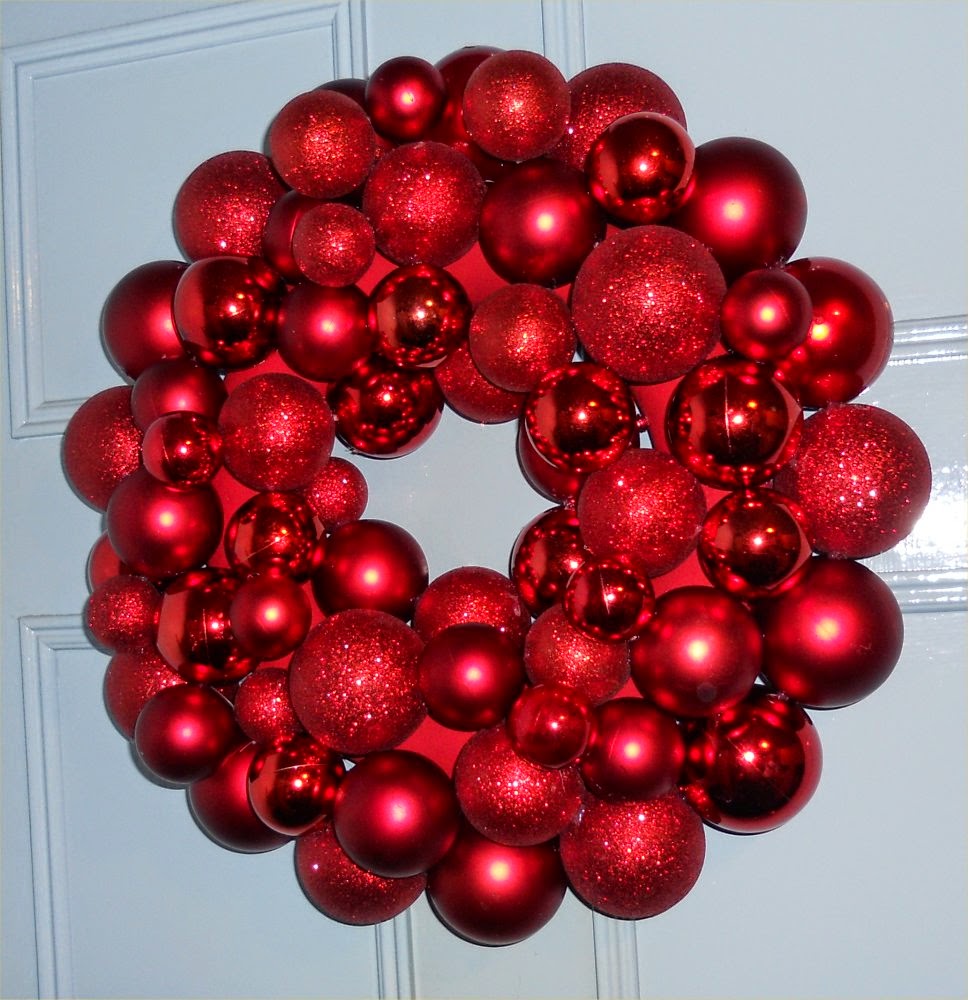
All you need to do now is attach a hook to the back of the wreath then put on a door and admire your handiwork....
Remember at the beginning of the post I said it was a toss-up as to which method I’d use to make the wreath. Here’s the other way.
Take a wire coat hanger and shape it into a circle. Untwist the top of the hanger so it comes apart. Thread the baubles onto the wire then re-twist the top of the hanger to secure them. Finally snip off the hook with some wire cutters or leave it as it is, then cover with some ribbon.
Have a great week.
Gertie xx
PS why not pop over to Handmade Monday to see what other fellow craft bloggers have been up to.
Sunday, 23 November 2014
Sunday, 16 November 2014
The return of the bake of the month
To make amends how about a fabulously moist chocolate cake with a chocolate topping? Your very own jaffa cake....
My version of a jaffa cake has orange syrup added to it as soon as comes out of the oven. I know what you’re thinking – won’t this make the cake heavy. Normally it would but not if you start off with a very light sponge.
To make this very light sponge I’m not going to tell you how much flour, butter/margarine or sugar to use. Don’t worry this isn’t a Bake Off technical challenge!!
To determine the weight of the other ingredient you first have to weigh the eggs. Take your eggs, still in their shells and put them on the scales to find out how much they weigh. This recipe is using three eggs but it will work exactly the same for two eggs, four eggs etc.
Let’s say my three eggs weigh 6 ¾ oz’s (I’m an old fashioned girl so always work in oz’s but you could use grams instead). Measure out 6 ¾ oz’s of self-raising flour, margarine/butter and caster sugar. No matter what the eggs weigh, always use the same weight for the flour, margarine/butter and sugar
Jaffa cake
Ingredients:
- Margarine/butter
- self-raising flour
- 1 ½ teaspoon of baking powder
- caster sugar
- 3 eggs (large)
- 1 large orange, grated
Topping:
- The juice of half an orange
- 2oz/50g caster sugar
- 2oz/50g dark chocolate, broken into pieces
Method:
- Line a 1lb loaf tin. I use Lakeland’s cake liners but you could use baking parchment.
- Pre-heat oven to 180º c/Gas Mk 4. Fan oven 160ºc.
- Weigh the eggs, still in their shells. Whatever the eggs weigh, that’s the amount you’ll need for the flour, sugar and butter/margarine.
- Put the sugar and butter/margarine into a bowl. Sift the flour along with the baking power into a bowl, and then add the three eggs.
- Beat well until everything is combined and mixture is smooth, to the point that it will drop off your spoon.
- Pour the batter into the loaf tin and level the top.
- Bake for 40 – 45 minutes until golden brown. To check to see if it’s cooked gently press the surface of the cake with a finger. If it springs back it’s done.
- Just before the cake has finished cooking, put the orange juice and the caster sugar into a microwavable cup and microwave on HIGH to dissolve the sugar. You could do this in a small pan if you like. I just think the microwave is much quicker.
- As soon as the cake is cooked take a cocktail stick and pierce the top of the cooked cake all over. Carefully spoon the orange syrup over the cake and leave in the tin to cool completely. Don’t worry if there are pools of syrup on top of the cake, it will sink in.
- When the cake is completely cold melt the chocolate in the microwave on Medium for 1 – 2 minutes, stirring the chocolate every ten seconds after one minute has passed. Again you could do this over a pan of hot water but make sure the water doesn’t touch the bottom of the bowl.
- Spoon the chocolate over the cake, letting it dribble down the sides and leave to set.
Tuesday, 11 November 2014
Open for business
Gertie’s Bags is now officially open!!!!
I had hoped to be up and running by the end of October. However the British weather wasn’t playing ball so the dull weather meant the bags couldn’t be photographed.
There’re only a small number of bags for sale. Sadly lack of storage space meant there isn’t the room at home for loads of stock. Plus if things don’t go well with Gertie’s business then I don’t end up with lots of unsold bags.
Before he retired Mr Gertie worked for a large multi-national retail company so he must have been bored ridged with me keep asking him questions or for advice.
One really good bit of advice from Mr Gertie was testing out the ordering process. That way, I could see the order through both as a customer and as a seller and check that everything was working ok.
On Folksy you’re able to see sold items, and as all Gertie’s Bags are unique, I simply couldn’t buy a bag then relist it. To get round that problem I put up for sale a bag I’d made ages ago and bought that one instead.
I’m pleased to say that everything worked out fine. All I need now is real customers.....
Gertie xx
Sunday, 2 November 2014
Potting around
I bet you thought I gone awol again. I was in the middle of two sewing projects and knew at least one of them would be finished in time for Sunday’s blog.
One of our good friends, Jenny, is having a new kitchen installed. So, I thought I’d make her some pot holders to protect her new work tops.
She’s cat crazy (five at the last count – I think! – plus others that she fosters....) so knew she’d appreciate felines’ one way or another.
Instead of buying some fabric with cats on and making four pot holders in no time at all I wanted each of them to be different.
The plan was to appliqué four cat poses on to the pot holders. As I’m not that good of an artist I found Google had some great silhouette images of cats. After making a shortlist of seven pussy cats I eventually whittled it down to four. The winning felines’ were then rescaled to fit the size I wanted and a template printed out on paper.
Previously when I’ve appliquéd I’ve used felt for the image as it doesn’t fray. This time I wanted to use fabric. Rather than doing a narrow hem to stop the edges from fraying, I attached a piece of iron-on interfacing to the back of the fabric before I cut the cat out.
There are a couple of stray bits of thread that have escaped the interfacing but I rather like it as it looks cat’s fur.
I wasn’t sure what colour scheme Jenny was going for in her new kitchen so I just chose four colours that would work with the black and cream.
I hope she likes them....
Have a great week.
Gertie xx
PS why not pop over to Handmade Monday to see what other fellow craft bloggers have been up to.
Sunday, 19 October 2014
The wanderer returns
I really didn’t think I’d be away so long. When I last blogged it was summer and now it’s nearly Halloween!!!!!
So what have I been up to?
I managed to fulfil (nearly) all the things I’d mentioned my last post – my recipes and cross stitch patterns are all trimmed, sorted and filed away in their various folders; the ‘spaghetti’ of cross stitch thread is now neat shade cards; as for the model of the Queen Mary II that I’m working on, I only managed to get the white parts of the balconies painted. In my defence my eyes kept crossing.....
Mr Gertie and I had another short break away, this time Stratford upon Avon. We love that part of the country so try and get down there every year. There’s two great places in Stratford to buy fabric so I came away with bulging bags and a worn out credit card.
Once my batteries had been recharged I felt ready to get back to all things fabric. First on the list of things to make were another cushion cover and a back cover for Wizzy (my wheelchair).
I was fed up with always having a wet back whenever I sat in Wizzy as his back rest is vinyl so between Mr Gertie and me we came up with a tabard type back cover. It also has two pockets at the back, perfect for holding a bottle of water (or two) whenever we go out for a walk.
Apologies to Wizzy for cutting part of him off the photo, only it was starting to rain (the big drops kind) and Mr Gertie was getting wet....
Both the cushion and back covers were made from Laura Ashley sample upholstery fabric (I inherited them from my mam and I’ve no idea where she got them from!!!) and I simply stitched the pieces together.
In the ‘a new beginning’ post I mentioned about my ‘new life’ and some of the things we were planning to do. One of them we did during the summer when Mr Gertie and I renewed our wedding vows. The other was starting up a business designing and making one-off bags and other handmade items.
It’s been quite a journey getting everything sorted (bags to make, setting up various accounts, etc, etc). Poor Mr Gertie must be sick of me talking ‘shop’ but I’m hopeful that at the end of the month ‘Gertie’s Bags’ will be open for business. Scary !!!
Have a great week.
Gertie xx
PS why not pop over to Handmade Monday to see what other fellow craft bloggers have been up to.
Sunday, 24 August 2014
Taking a break
I should have called this post ‘here today, gone tomorrow’ as no sooner had I blogged about being AWOL, then I go missing for again!!!!
Last weekend we were down in Nottingham for our friends’ birthday. I’m pleased to report that both birthday girls (see my last post) were delighted with their bags. Jan was really guilty about how long hers took to make. Sadly Fiona couldn’t make the party so I had to pop hers in the post.
As I’ve been franticly sewing morning, noon and night for these past few weeks I thought I could do with a little break away from all things fabric. Mr Gertie is pleased as he thinks I’ve been spending too much time sewing and is worried that I’ll sicken myself with it.
Seeing as all things fabric and sewing machines are banned it’s given me a chance to catch up with things that shamefully I’ve been neglecting.
I’m always looking out for new recipes, so whenever I see something I like in magazines or newspapers, I tear it out to be filed (eventually) in my various recipe folders.
This ever growing pile of recipes was waiting to be photocopied or trimmed down into plastic wallet size. While the guillotine was out I did the same thing to the stack of cross stitch patterns I’ve been collecting.
Talking of cross stitch, over the years I’ve amassed loads of threads from various kits and freebies. It seemed a shame to get rid of them as they’d be ideal for when I need just a small amount of thread for a project.
The plan is to sort them into the various colour groups then make some cardboard thread sorters to keep them together. Let’s hope I have better luck making the sorters than the last time I made some. All went well until I noticed that not only had I punched holes in the cardboard but into the bottom of my t-shirt too....
A couple of years ago I bought an airfix model making kit of Wallace and Gromit (I was looking for something different to keep me occupied) and that lead me to enjoy model making. Having made all the Wallace and Gromit and Shaun the Sheep kits available Mr Gertie suggested I try upping the ante and make something a little more challenging.
I didn’t fancy making the traditional tanks or soldiers so decided to make HMS Bounty. After finishing that I then set myself a huge challenge - a four foot model of the cruise ship Queen Mary II.
I wouldn’t say it’s big but the instructions make ‘War and Peace’ look like a coffee break book.... Not only do I have to contend with bits being on the large size, I’ve also got to deal with things being rather small.
These are some of the cabin balconies. There are 478 in total, each requiring the floor being painted brown and the sides and window panes gloss white. All that in just a ¼ inch...
I don’t make things easy for myself, do I!!!!
Have a great week.
Gertie xx
PS why not pop over to Handmade Monday to see what other fellow craft bloggers have been up to.
Last weekend we were down in Nottingham for our friends’ birthday. I’m pleased to report that both birthday girls (see my last post) were delighted with their bags. Jan was really guilty about how long hers took to make. Sadly Fiona couldn’t make the party so I had to pop hers in the post.
As I’ve been franticly sewing morning, noon and night for these past few weeks I thought I could do with a little break away from all things fabric. Mr Gertie is pleased as he thinks I’ve been spending too much time sewing and is worried that I’ll sicken myself with it.
Seeing as all things fabric and sewing machines are banned it’s given me a chance to catch up with things that shamefully I’ve been neglecting.
I’m always looking out for new recipes, so whenever I see something I like in magazines or newspapers, I tear it out to be filed (eventually) in my various recipe folders.
Talking of cross stitch, over the years I’ve amassed loads of threads from various kits and freebies. It seemed a shame to get rid of them as they’d be ideal for when I need just a small amount of thread for a project.
The plan is to sort them into the various colour groups then make some cardboard thread sorters to keep them together. Let’s hope I have better luck making the sorters than the last time I made some. All went well until I noticed that not only had I punched holes in the cardboard but into the bottom of my t-shirt too....
A couple of years ago I bought an airfix model making kit of Wallace and Gromit (I was looking for something different to keep me occupied) and that lead me to enjoy model making. Having made all the Wallace and Gromit and Shaun the Sheep kits available Mr Gertie suggested I try upping the ante and make something a little more challenging.
I didn’t fancy making the traditional tanks or soldiers so decided to make HMS Bounty. After finishing that I then set myself a huge challenge - a four foot model of the cruise ship Queen Mary II.
I wouldn’t say it’s big but the instructions make ‘War and Peace’ look like a coffee break book.... Not only do I have to contend with bits being on the large size, I’ve also got to deal with things being rather small.
These are some of the cabin balconies. There are 478 in total, each requiring the floor being painted brown and the sides and window panes gloss white. All that in just a ¼ inch...
I don’t make things easy for myself, do I!!!!
Have a great week.
Gertie xx
PS why not pop over to Handmade Monday to see what other fellow craft bloggers have been up to.
Sunday, 10 August 2014
Busy, busy, busy...
Sorry I’ve been AWOL for several weeks only it’s been all go in the Gertie household!!!!
Our good friends who live in Nottingham and Derby came ‘up north’ for the weekend to help celebrate Mr Gertie’s significant birthday and also his retirement. We hadn’t seen them for a while so it was great to catch up.
Even though we’ve just come back from holiday we’ve been away again – twice. In my defence both were for hospital appointments. The first was in Manchester, and as it was a 9am appointment we had to travel down the day before.
The second one was to see the Professor (the wonderful man who performed his magic on my hip) in London. Again we decided to travel down before hand or in this case a few days before. It seemed such a wasted opportunity not to.
I’ve also been frantically sewing. A friend of a friend loved the bag I made as a birthday present and asked if I could make something similar.
The brief was:
• a rucksack big enough to hold her knitting when she goes to her knitting classes
• a pocket at the front to keep scissors, tape measure etc
• adjustable straps
• the fabric must have dogs on it and not be of boring colours
We’re off down to Nottingham soon for Jenny’s birthday so I asked the birthday girl if she would like a ‘Gertie creation’ as a present. I’d love a couple of make-up bags she replied as I can’t find the right size. No problem.
The brief was simple: if possible a waterproof lining and any kind of cat fabric.
As Jenny asked for a make-up bag that could hold large items I decided to change the way I made the bags. Instead of constructing them where the top is larger than the bottom, I made them using Pythagoras Theorem....
I am rubbish at maths so had to ask Mr Gertie for help. However once it was explained it’s so easy to work out. If you want to give it a go check out this blog (it explains it so much better than I could.).
And finally a belated birthday present. Last November our friend Jan was having a party to celebrated a significant birthday (21 again....). As I was convalescing from my hip surgery (or more importantly banned from my sewing room) I couldn’t make a anything for her so had to give an IOU birthday bag voucher instead.
When she was up for the weekend she redeemed her voucher by asking if I could make her another jewellery tool bag. I’d like it a bit bigger than the last one, she asked, say tray size....
The brief was:
• a bag about 16 inches by 13 inches
• lilac fabric
• two pockets in the lid – one elastic and the other zipped
• elastic pockets of various sizes all around the edge of the bag
• a handle on the lid
If I’m honest my heart sank when she asked for another tool bag – especially one the size of a tray. When I made the original one it took a couple of attempts to make it strong enough. Eventually I had to reinforce the lid and base with heavy weight interfacing. That certainly wouldn’t work this time.
Following advice from Mr Gertie on how to strengthen the bag I bought a roll of corrugated cardboard. The idea being I sandwich three layers of cardboard together, the two outer layers having the corrugated lines running one way and running the opposite for the inner layer. Ideally they would have been secured using staplers but as I’ve only got a tiny stapler, sellotape had to do. For extra strength Mr Gertie suggested I put a couple of stitches in the centre to hold them all together.
Unlike the lid and base I needed both strength and bend-ability for the sides so had to leave out the middle cardboard ‘sandwich’ layer.
I know you’re not supposed to use cardboard in bags, unless it can be removed, as it turns to mush when washed. However we were at a loss as to how to make it stable so this bag is ‘dry clean only’....
As you can see from the photo the inside pockets aren’t elasticated. Having battled to attach what seemed like a six foot elastic snake, the sides simply weren’t strong enough to cope with the elastic pockets. No amount of extra cardboard around the sides would stabilise it, so reluctantly I had to take out the elastic and make them pleated pockets instead.
Due to the cardboard providing stiffness to the bag it wasn’t possible to use a sewing machine so a lot of the stitching had to be done by hand - my poor fingers were covered in blisters....
Whilst it may not look much this bag has gone down in history as the most time consuming thing I’ve ever made. It took over 74 hours to make, and boy was I pleased when it was finished!!!!!
Have a great week.
Gertie xx
PS why not pop over to Handmade Monday to see what other fellow craft bloggers have been up to.
Subscribe to:
Posts (Atom)